TrueDialog Portal
Sending Messages > Campaigns
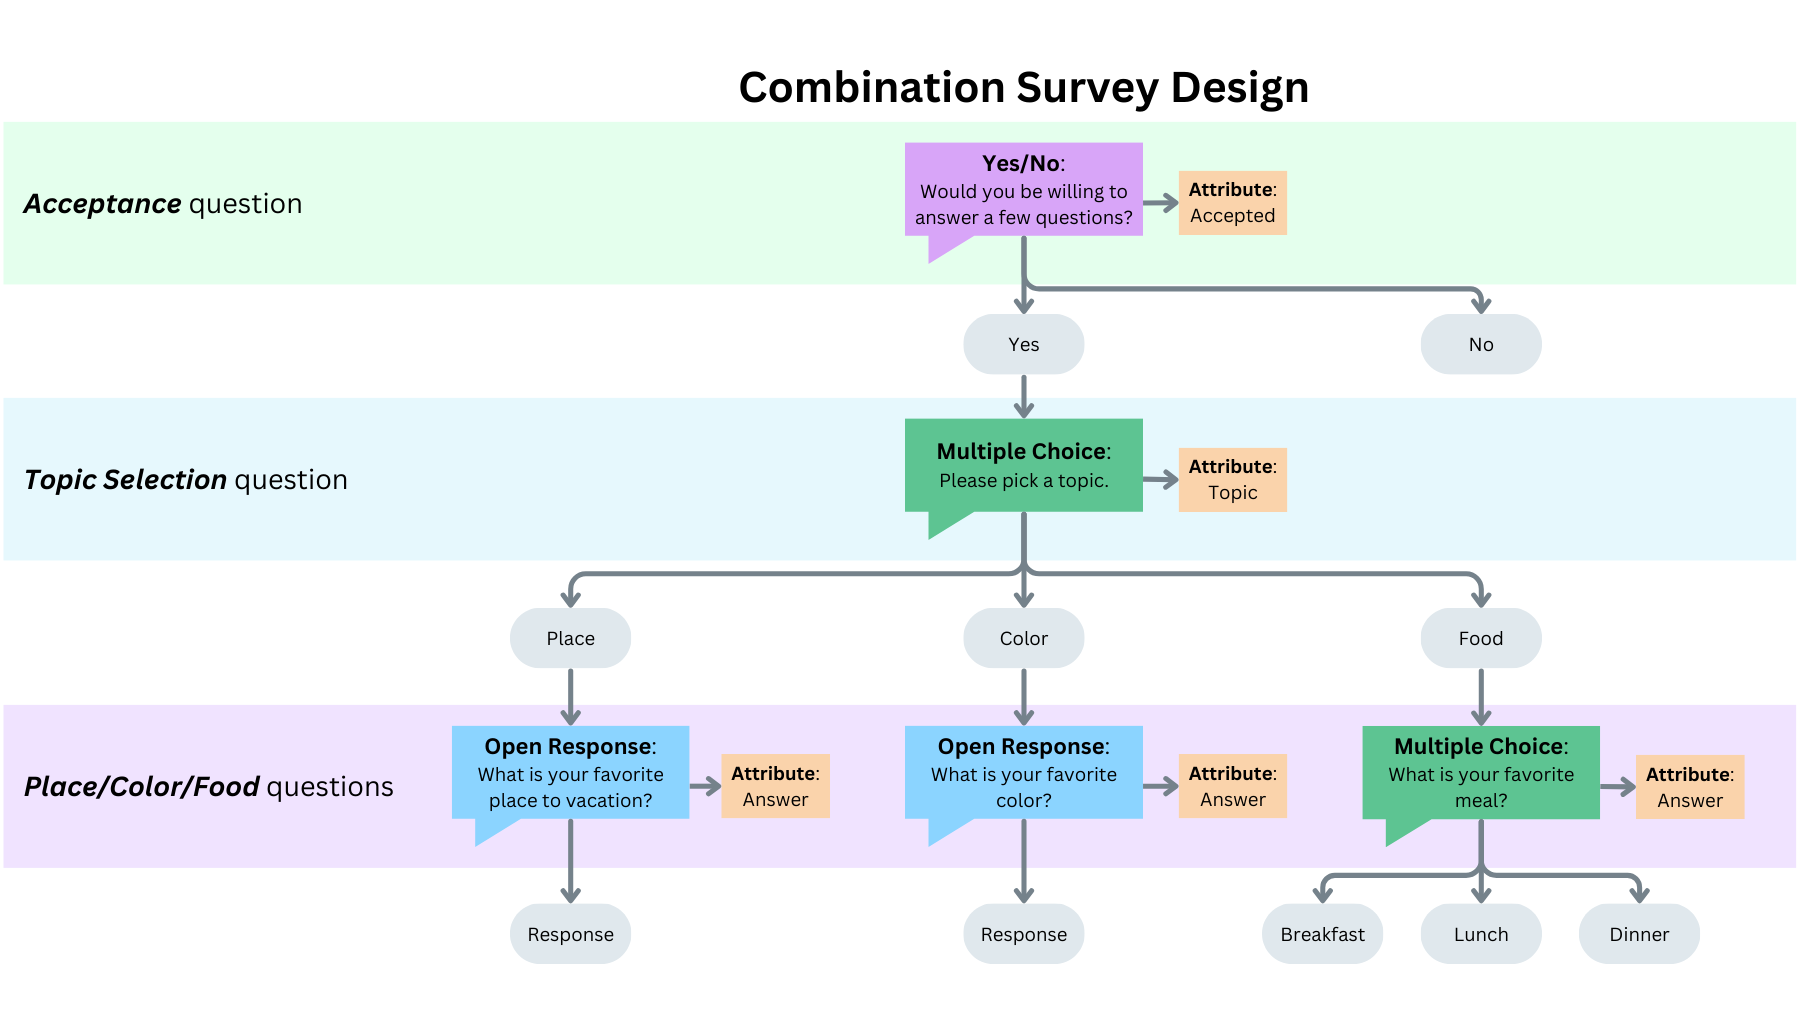
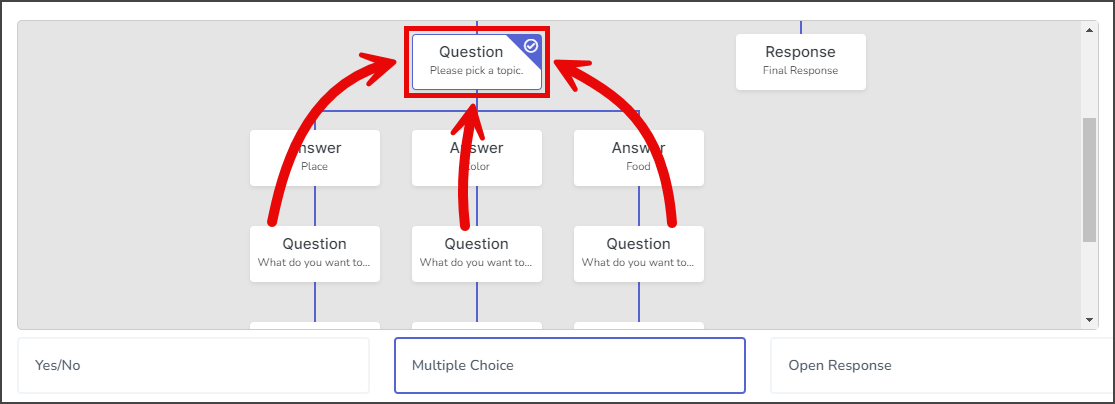
This guide will help you create a survey that combines all the different question types. If you’re planning to design a survey that involves multiple questions, using some form of aid, such as a flow chart, is recommended to help you through the process. The example in this guide includes each question type, and it assumes that you already have a basic understanding of them. If not, please refer to the Creating a Campaign – Survey Overview article to learn about each question type. Review the flow chart below to understand better how the survey is constructed.
Create Contact Attributes
The survey in this example uses Contact Attributes to store the user’s answers to the survey as part of their contact. The Contact Attributes must be created before the campaign. This guide assumes you are already familiar with creating Contact Attributes. If not, refer to the article Creating a Contact Attribute for more details on creating Contact Attributes.
- Expand Contacts in the left sidebar and select Contact Attributes.
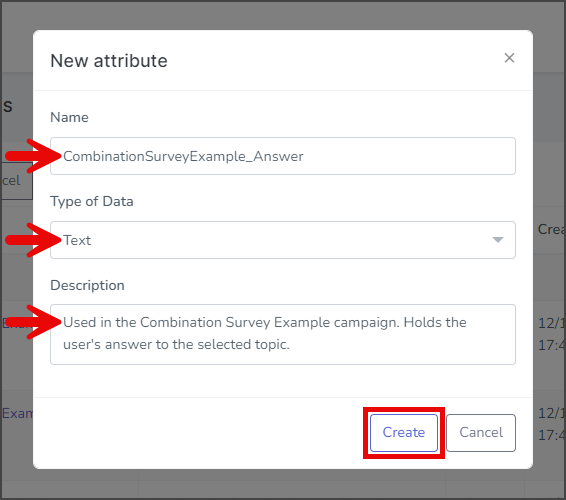
- Click New Attribute.
- Fill out the form to create an attribute to store the reply from the Acceptance question. Since this question is a Yes/No question, the attribute Type of Data must be Yes/No.
- Click Create to create the attribute.

- Next, click New Attribute.
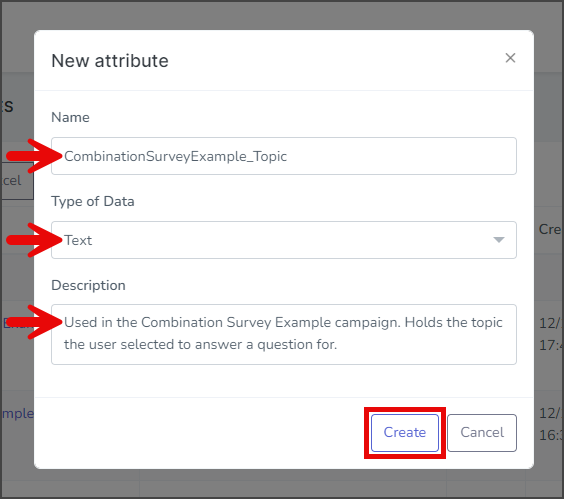
- Fill out the form to create an attribute to store the answer from the Topic Selection question. Since this question is a Multiple Choice question, the attribute Type of Data must be Text.
- Click Create to create the attribute.
- Next, click New Attribute.
- Fill out the form to create an attribute to store the answer from one of the Place/ColorFood questions. Since these questions include Multiple Choice and Open Response questions, the attribute Type of Data must be Text.
- Click Create to create the attribute.
Create a Survey Campaign
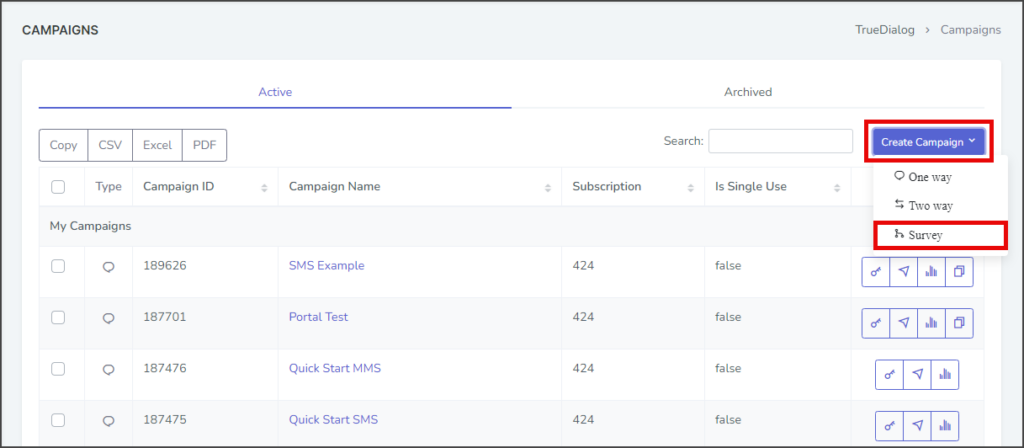
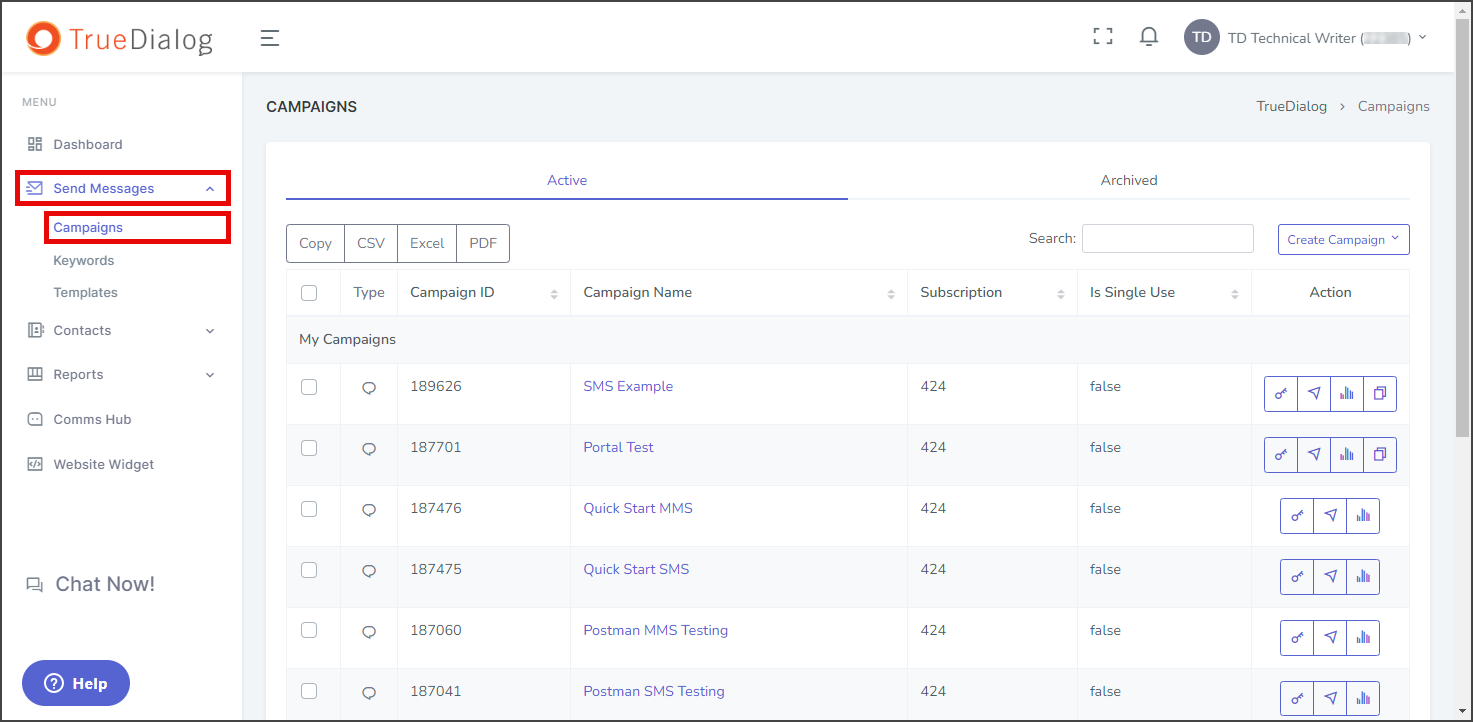
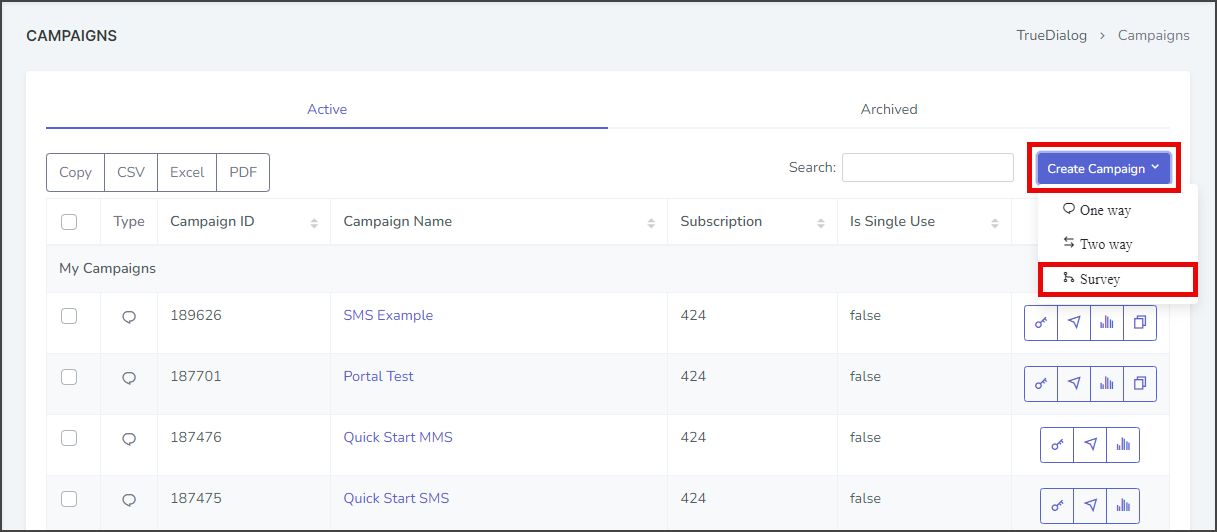
- Expand Send Messages in the left sidebar and select Campaigns.

- Click the Create Campaign dropdown and select Survey to open the New Survey Campaign window.
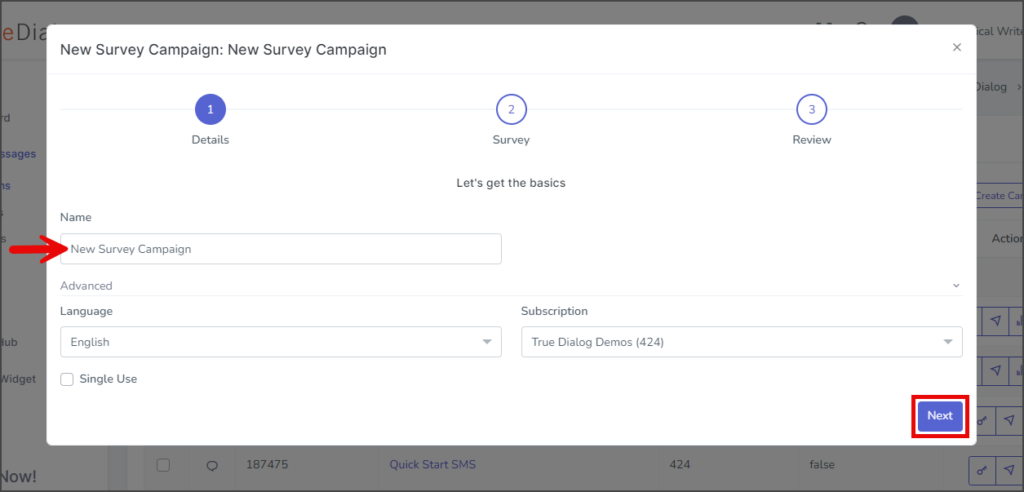
- Enter your campaign’s name in the Name textbox.
- (Optional) Expand the Advanced section.
- Language – Select the language to use for the campaign. Survey campaigns only support a single language.
- Subscription – Select the subscription to use for this campaign. The default subscription will be selected.
- Single Use – If checked, the end-user will receive a message from this campaign only once. Note: Don’t set it to Single Use until testing is complete.
- Click Next to go to the survey page.

Survey Page
This survey is made up of five questions. The instructions for each question are separated into different sections.
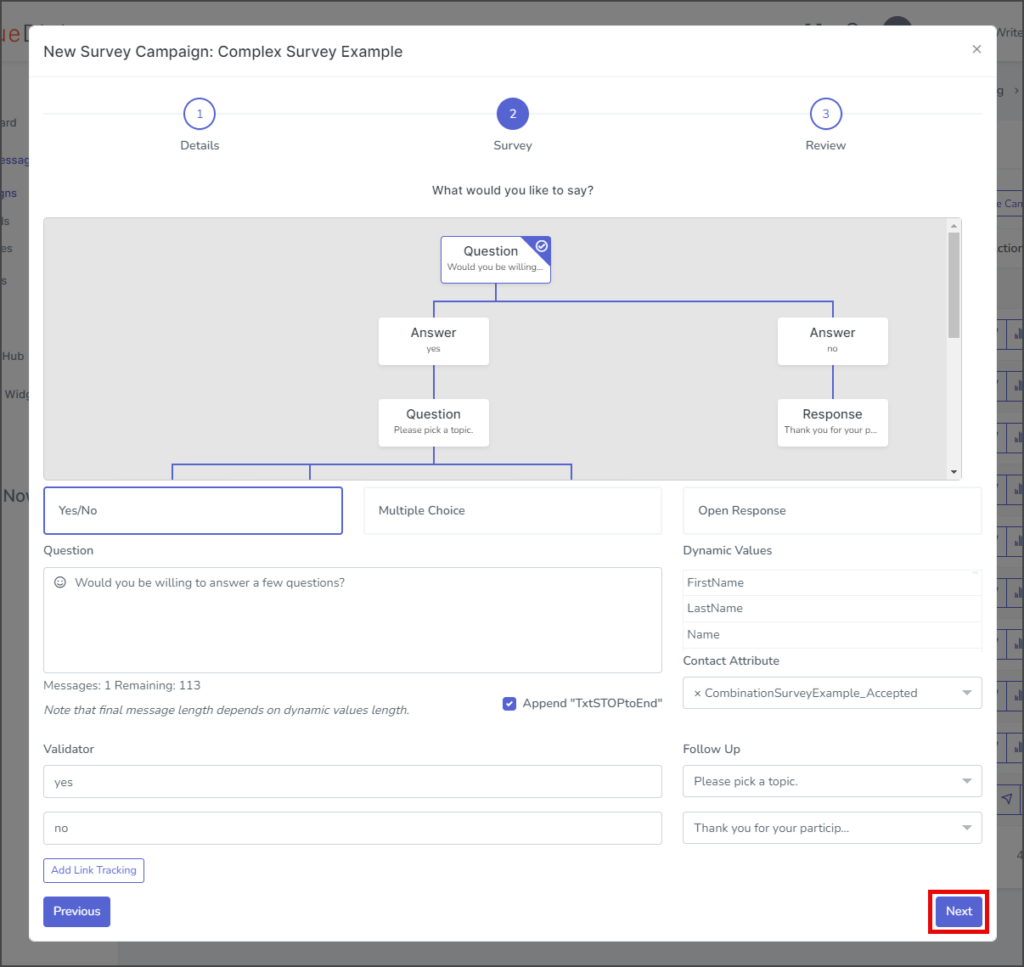
First Question
Create the Acceptance question:
- Select Yes/No.
- Enter the Acceptance question in the Question textbox.
- Click the Contact Attribute dropdown and select CombinationSurveyExample_Accepted.
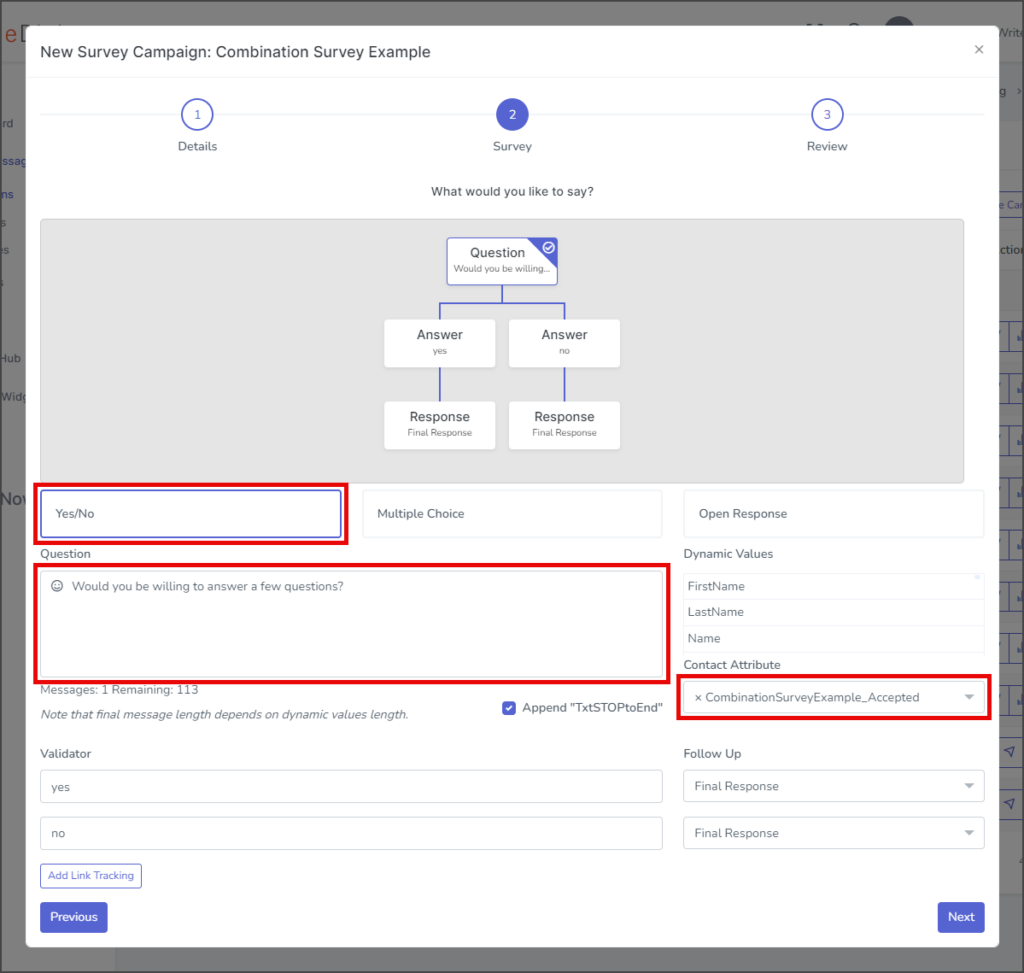
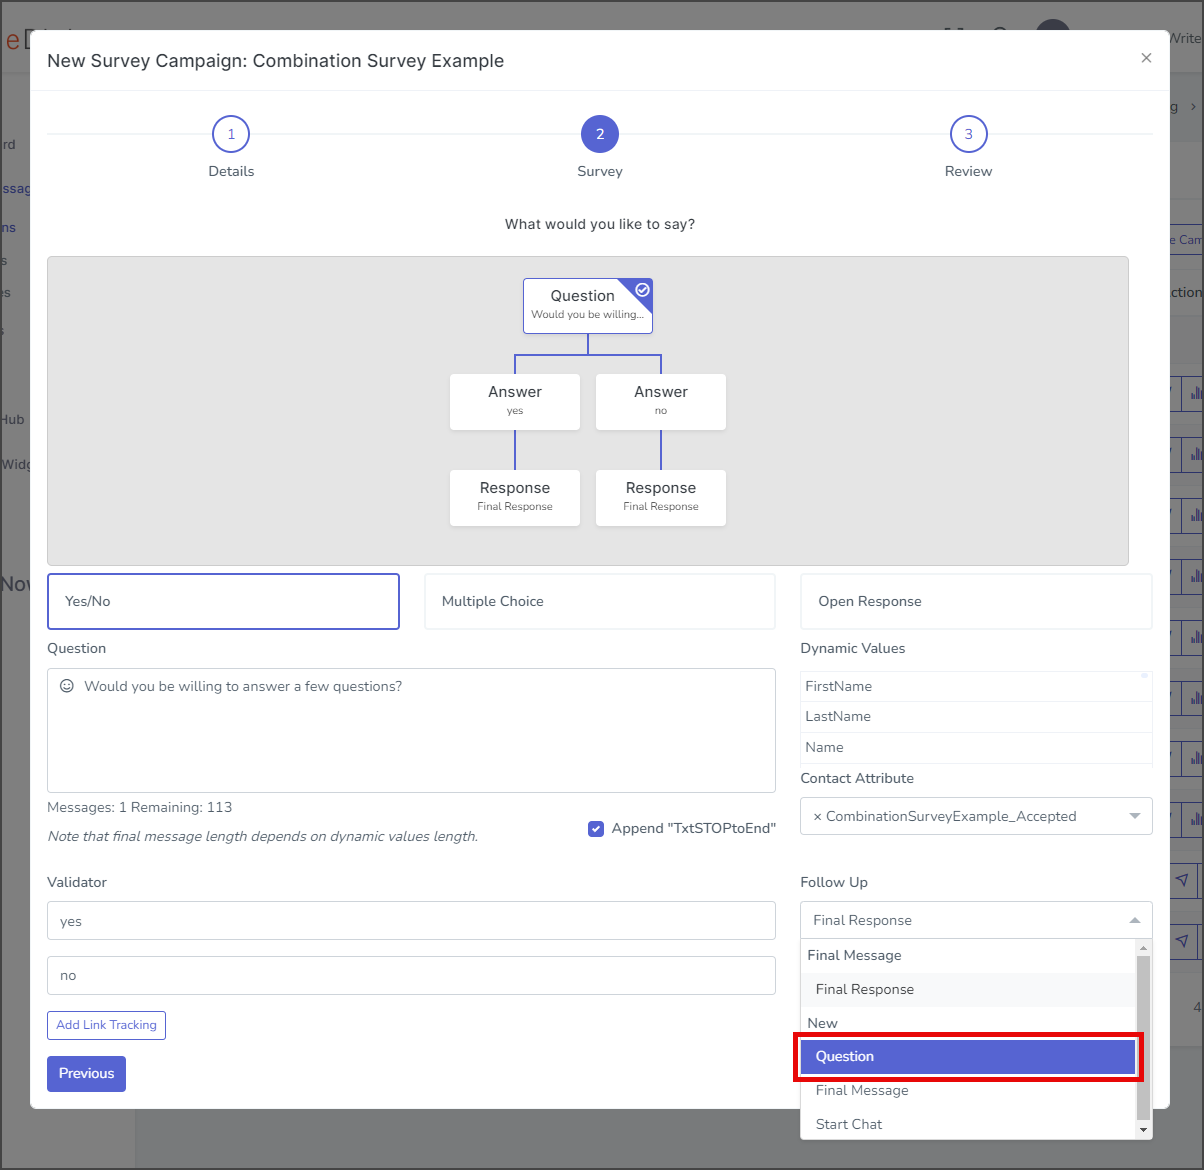
- Click the Follow Up dropdown for yes and select New → Question. This will create a new question for the Response to yes.


Second Question
Create the Topic Selection question:
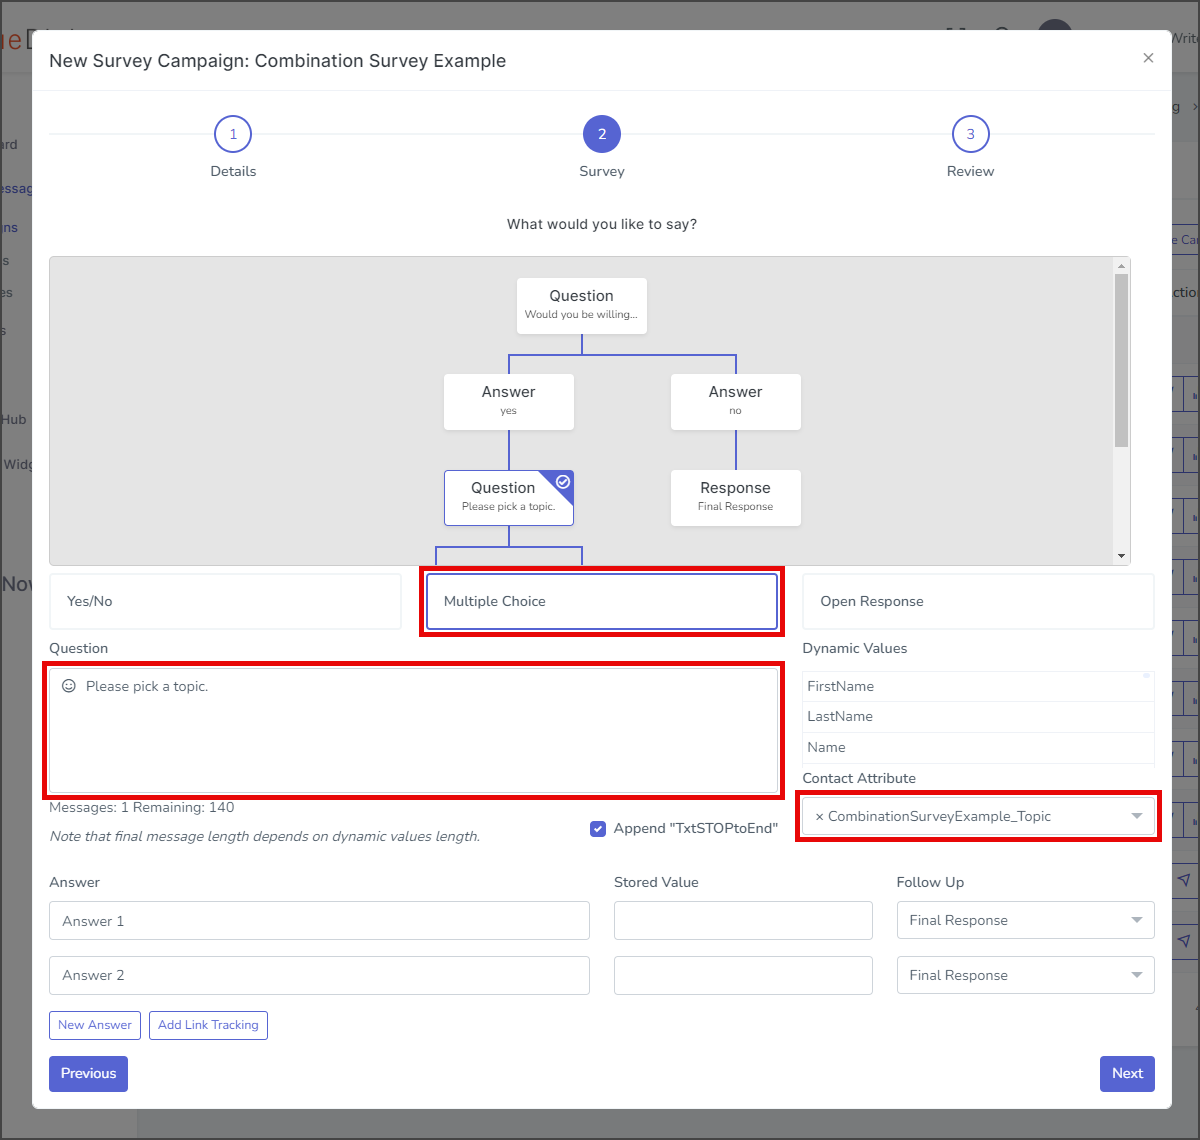
- Select Multiple Choice.
- Enter the Topic Selection message in the Question textbox.
- Click the Contact Attribute dropdown and select CombinationSurveyExample_Topic.
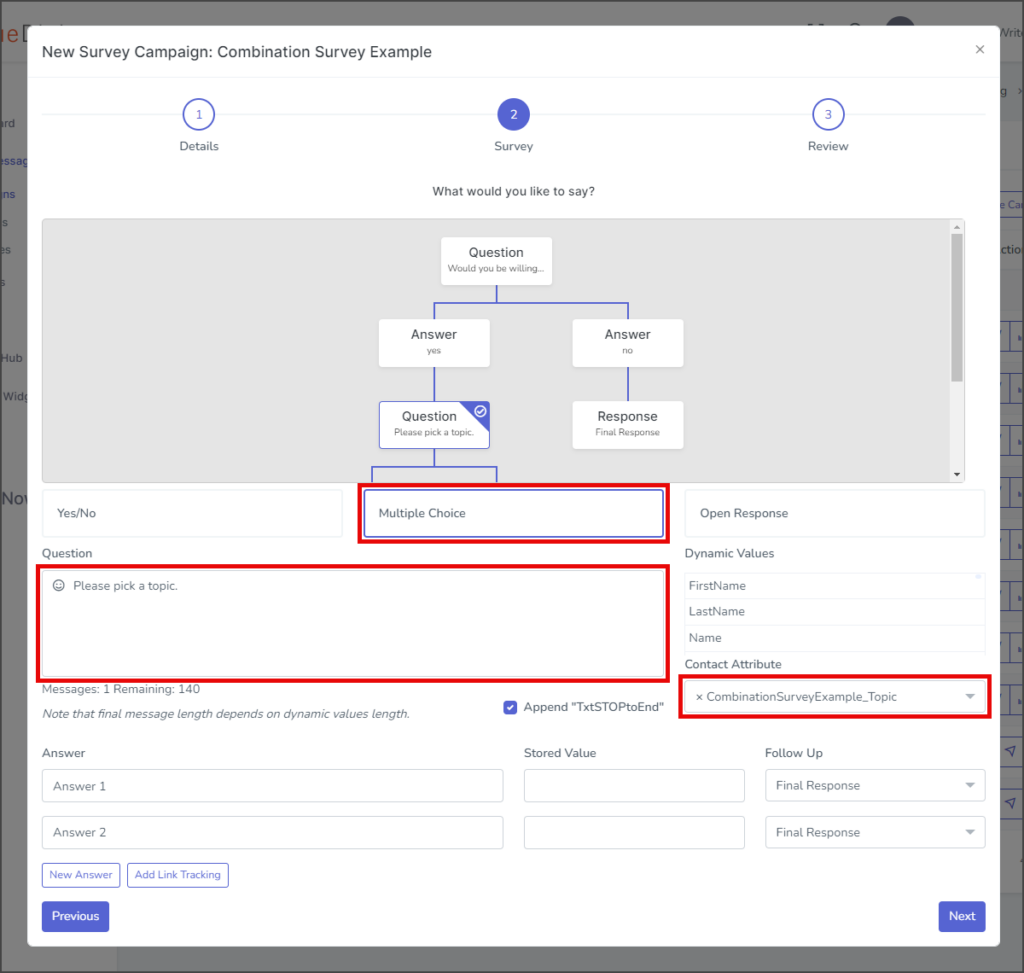
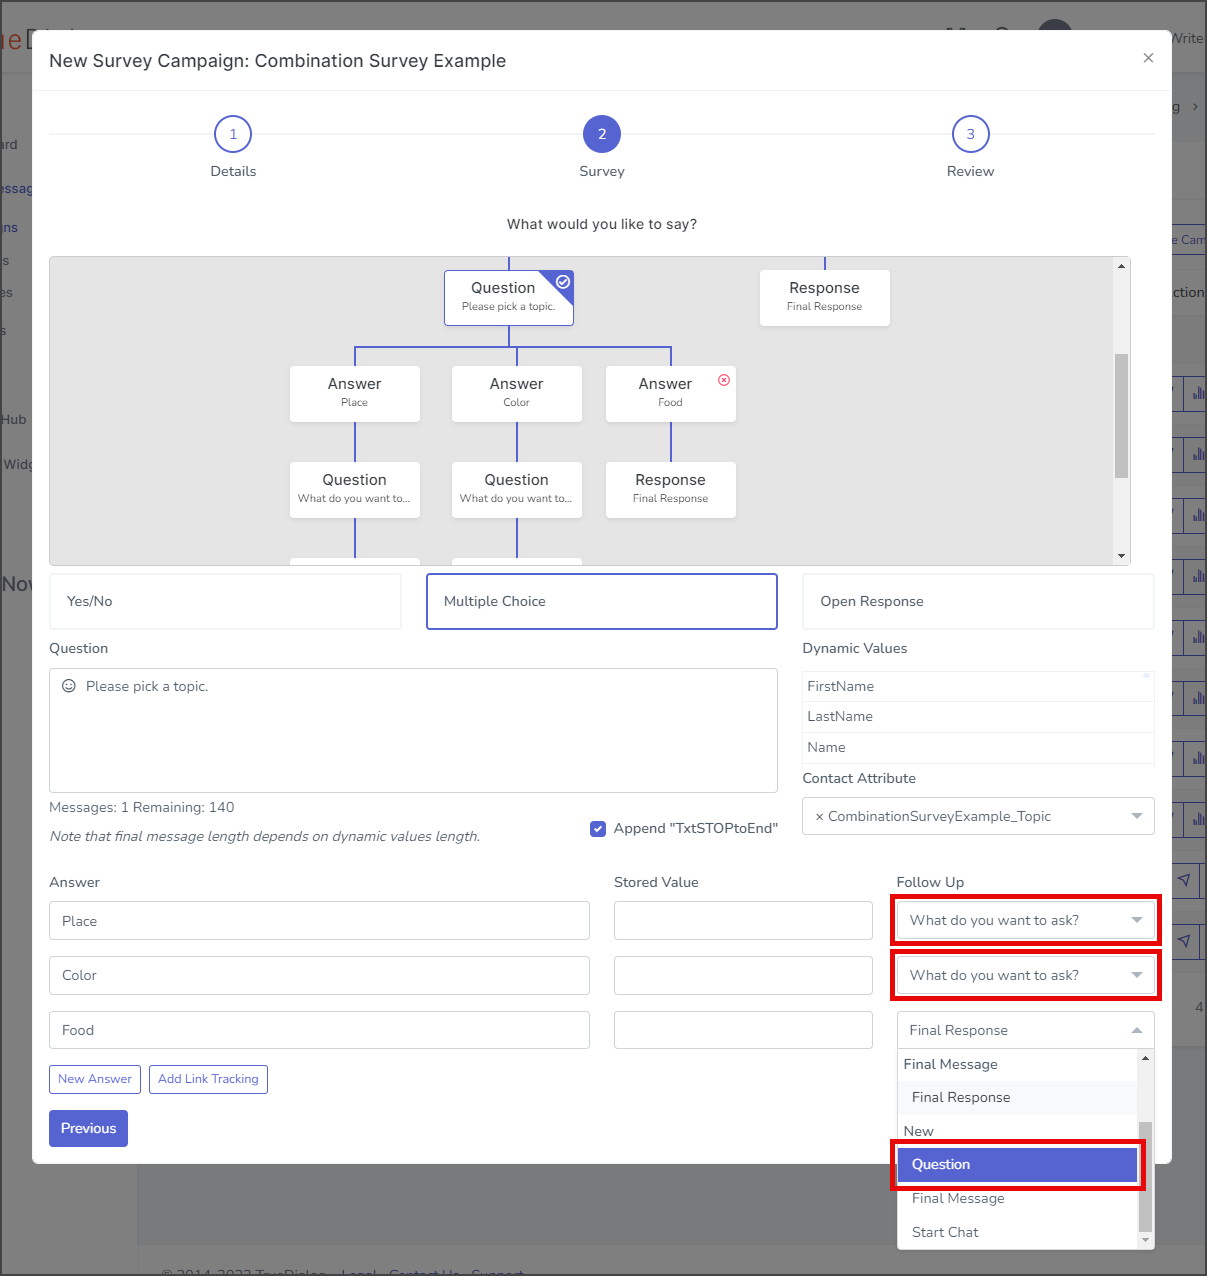
- Click New Answer to add another multiple-choice answer row.
- Enter the Topic Selections in each of the Answer fields.

- Click the Follow Up dropdown and select New → Question for each Topic Selection.
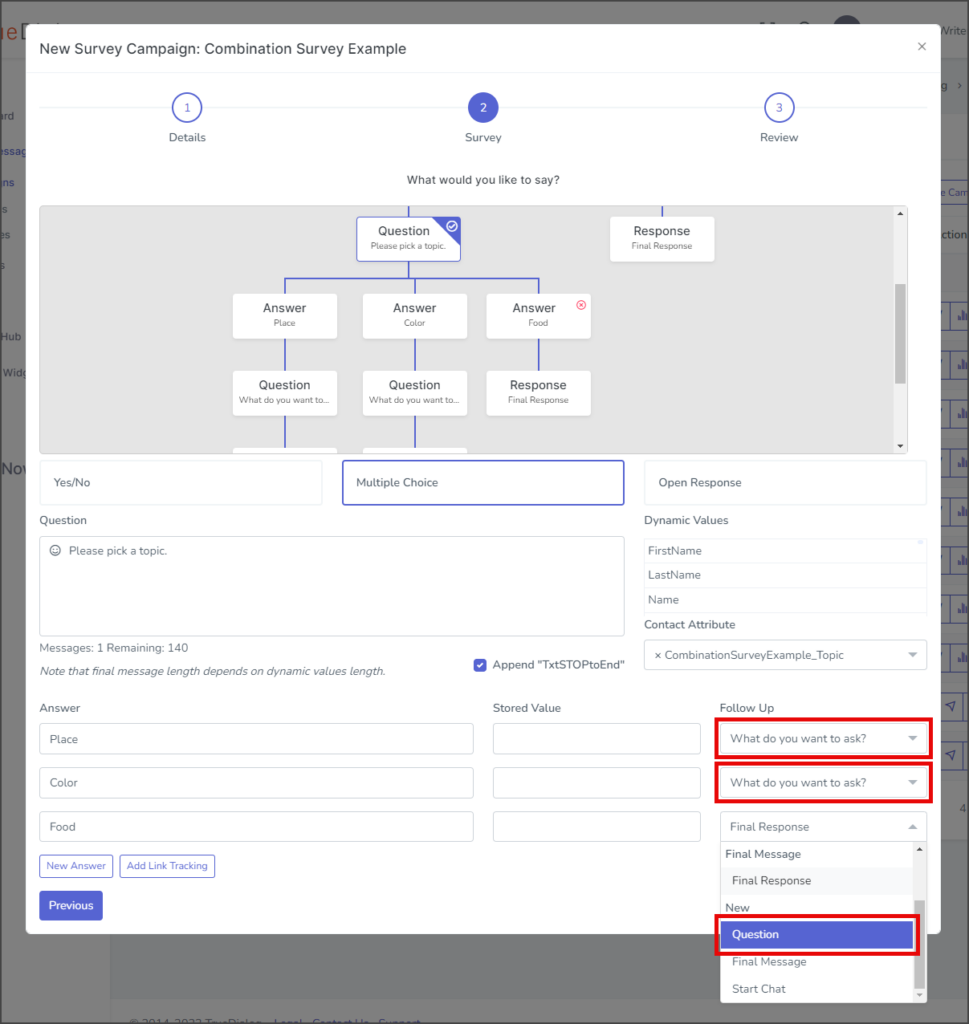
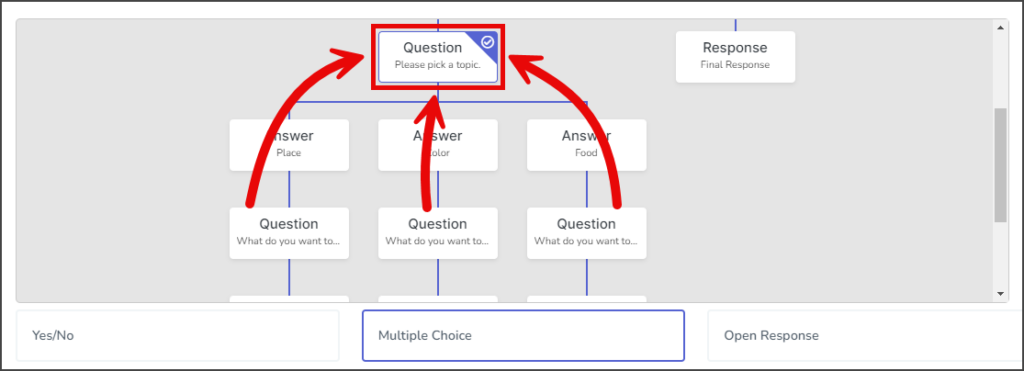
- Each time a New → Question is selected, the window will move to the newly created question, and you must click on the Topic Selection question box to choose the next Follow Up response.

Third Question
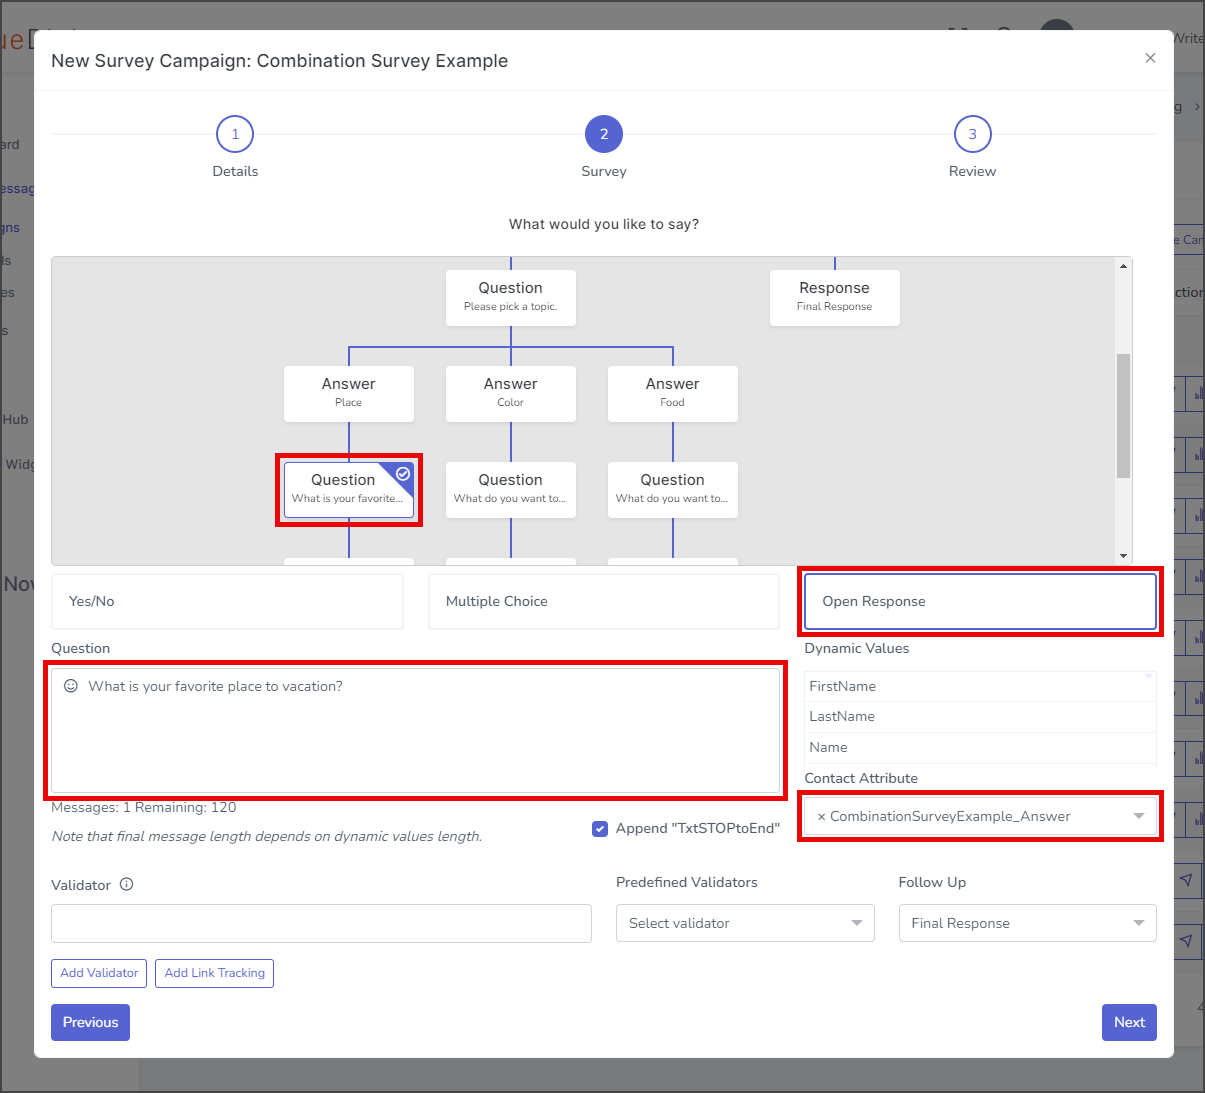
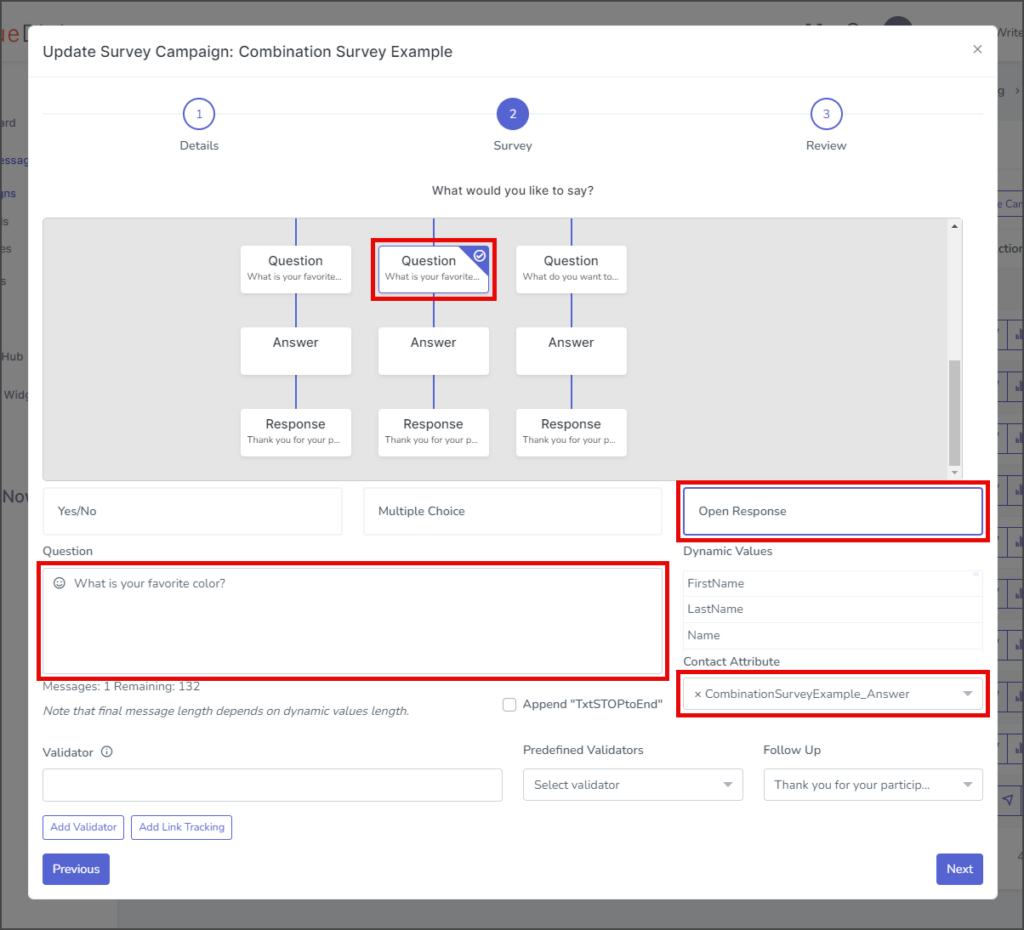
Create the Place question:
- Click the Place question box.
- Select Open Response.
- Enter the Place question in the Question textbox.
- Click the Contact Attribute dropdown and select CombinationSurveyExample_Answer.
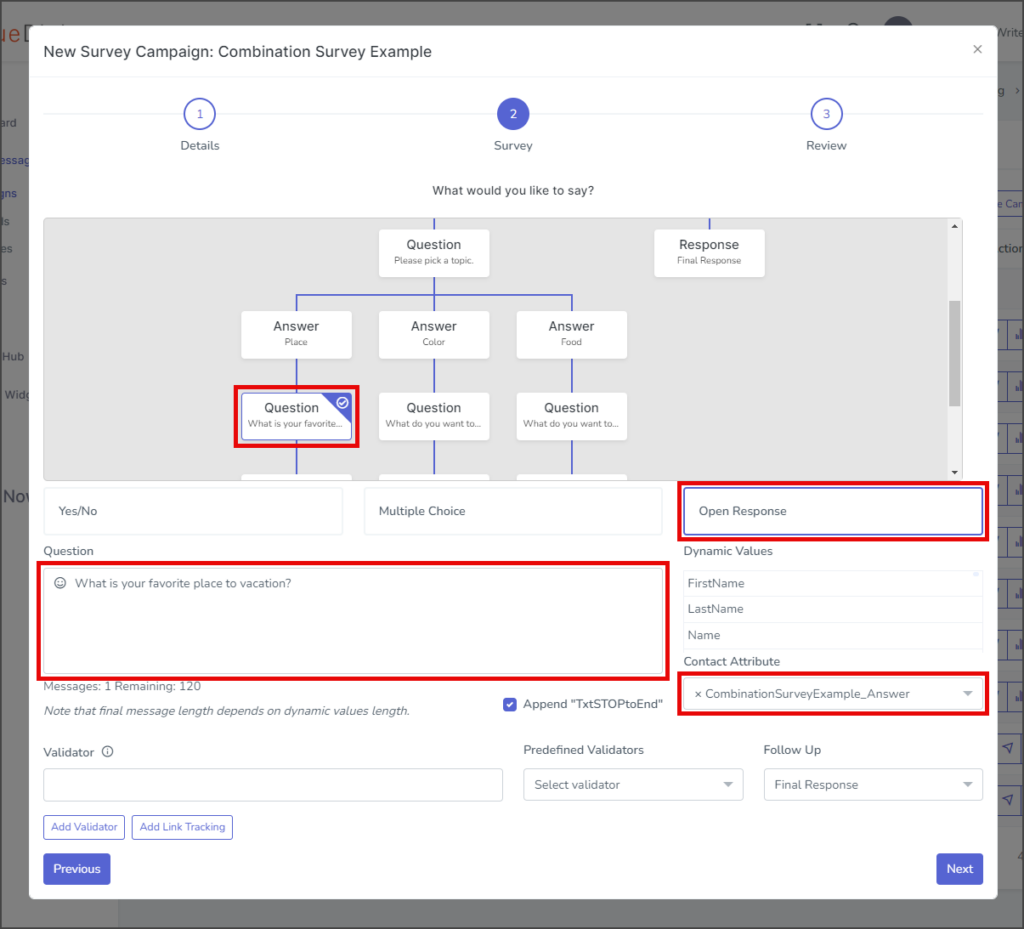
- Leave the Validator field empty to accept all responses from the end-user.
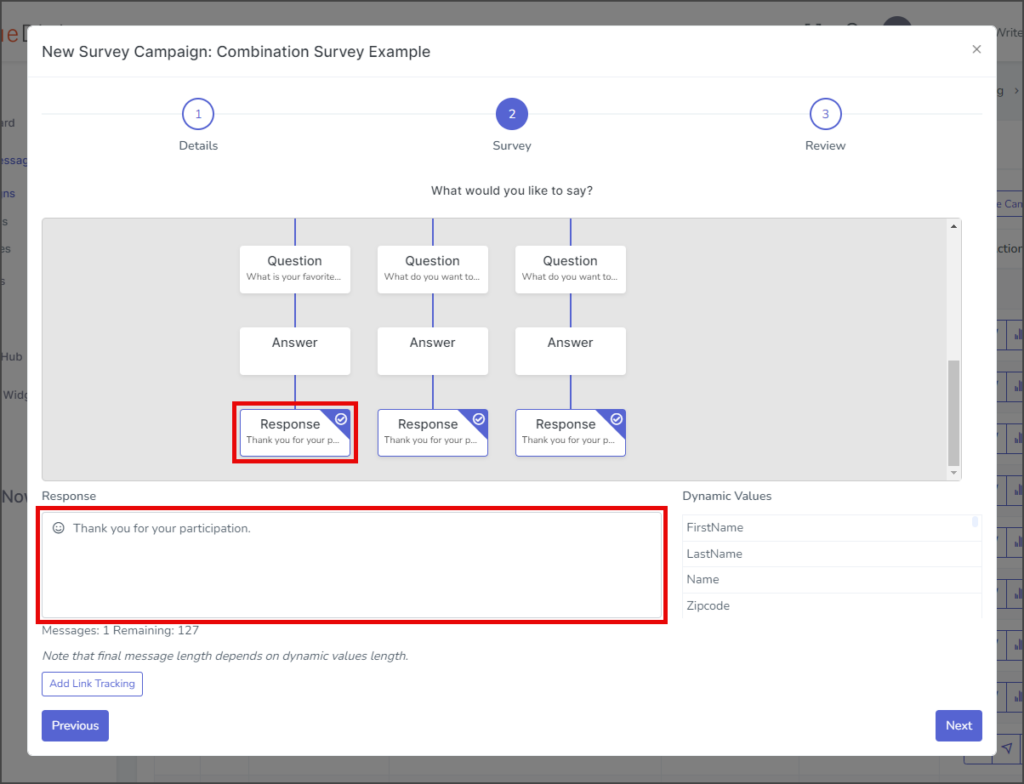
- Click the Response box for the Place question.
- Enter your final message in the Response textbox. All Final Messages are the same by default, so the response entered here will be the same for all Responses. (To have a different Final Message for an answer, create a new Final Message in the Follow Up dropdown.)

Fourth Question
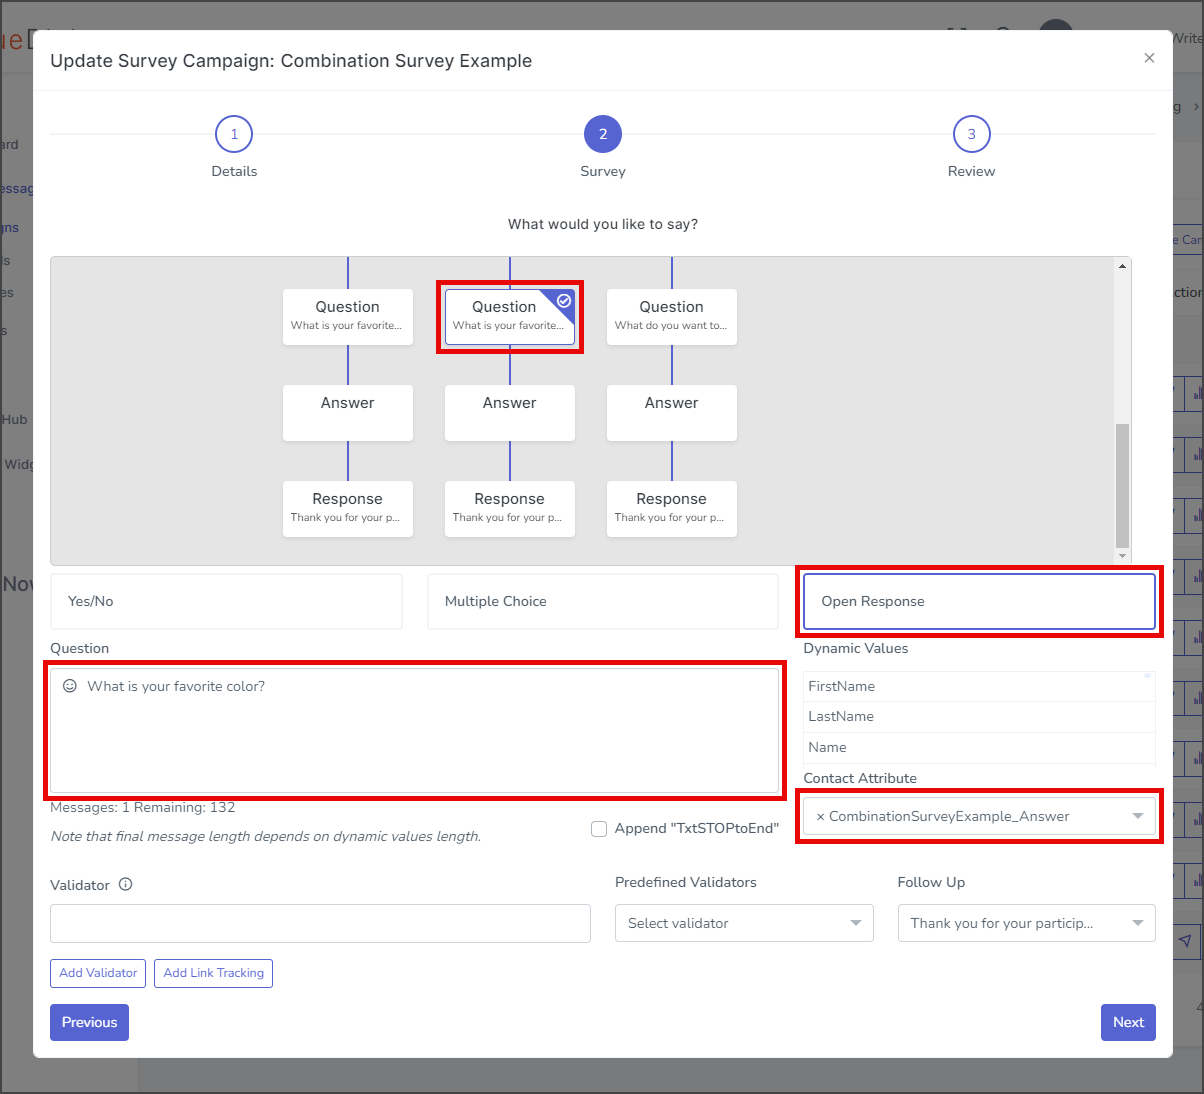
Create the Color question:
- Click the Color question box.
- Select Open Response.
- Enter the Color question in the Question textbox.
- Click the Contact Attribute dropdown and select CombinationSurveyExample_Answer.
- Leave the Validator field empty to accept all responses from the end-user.
- Leave the Follow Up response as the default Final Message.
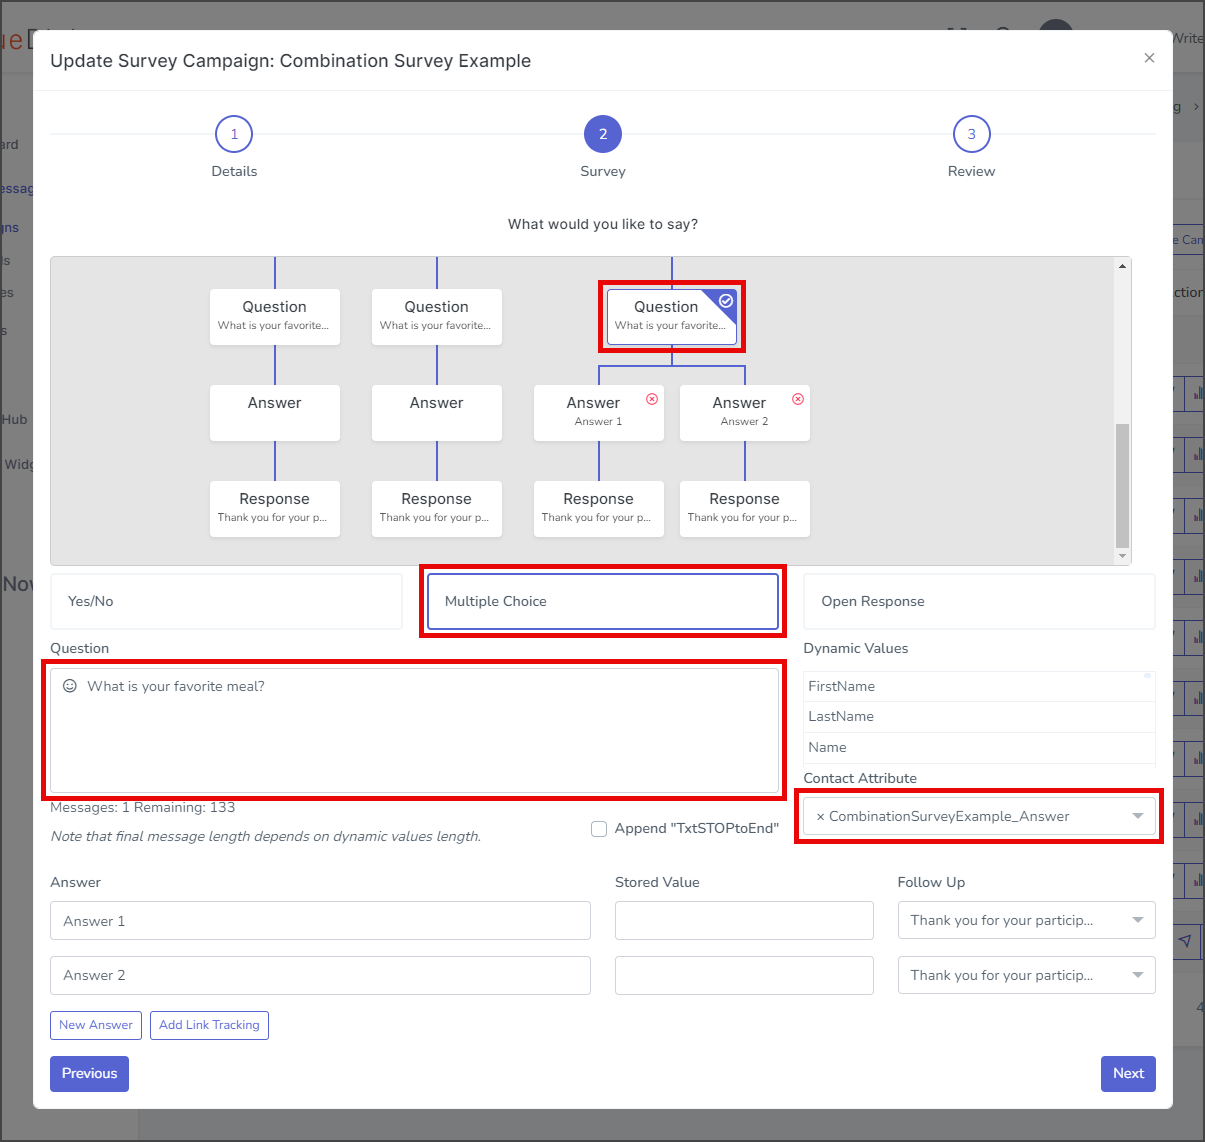
Fifth Question
Create the Food question:
- Click the Food question box.
- Select Multiple Choice.
- Enter the Food question in the Question textbox.
- Click the Contact Attribute dropdown and select CombinationSurveyExample_Answer.
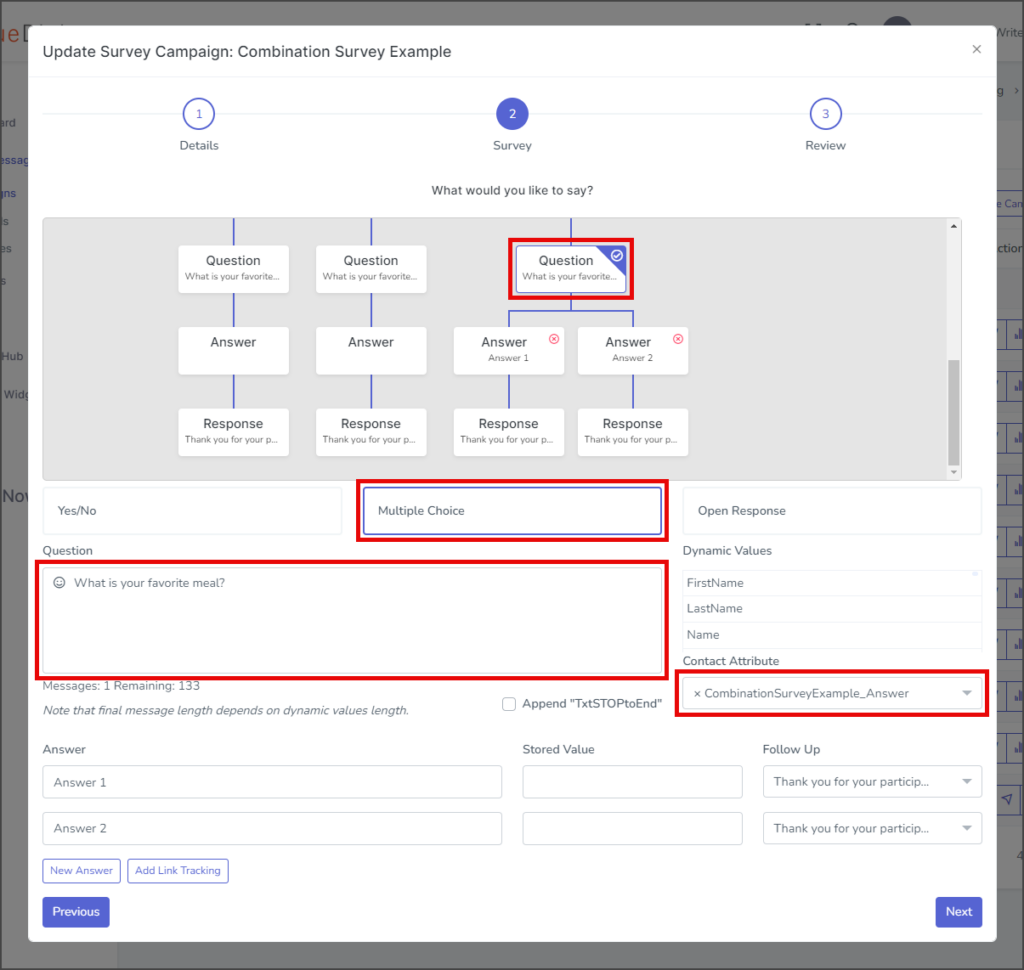
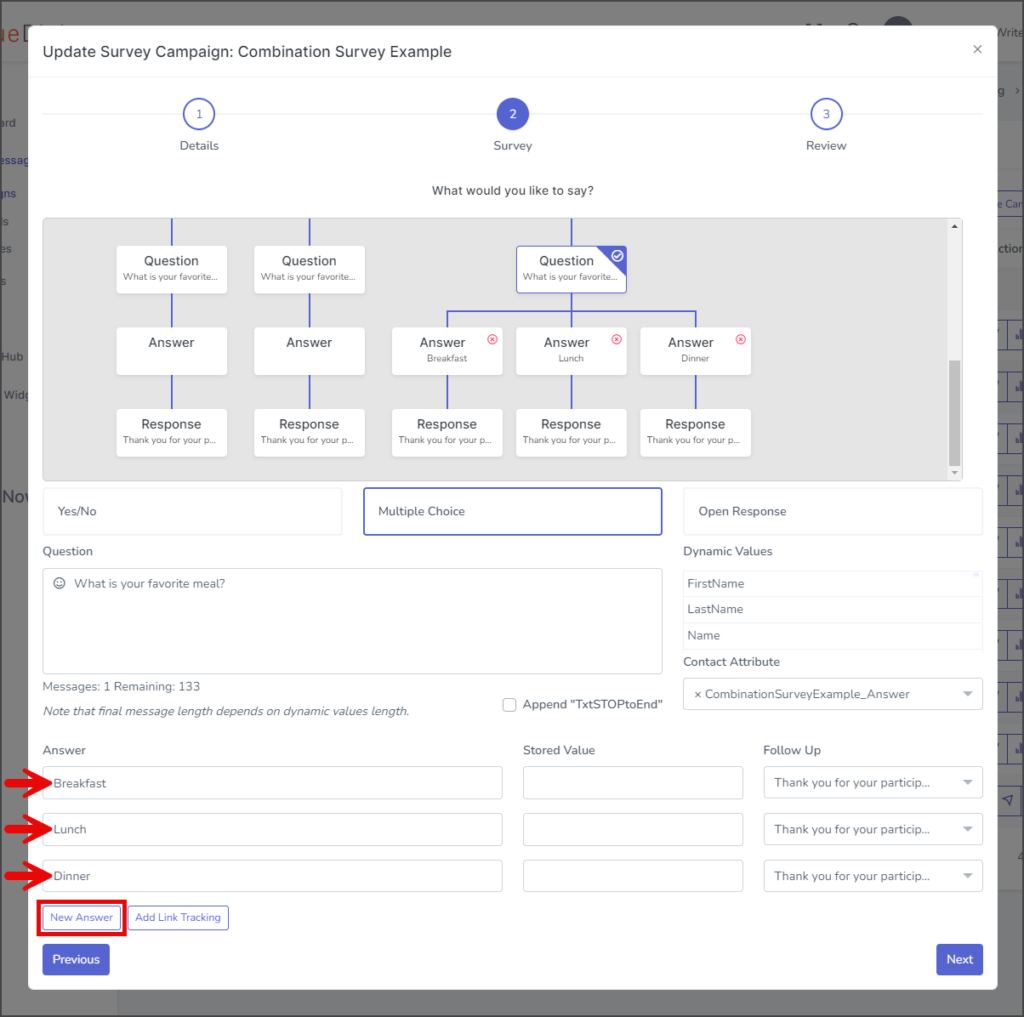
- Click New Answer to add another multiple-choice answer row.
- Enter the meal choices in each of the Answer fields.
- Leave the Follow Up response as the default Final Message.

Finish Survey
- Check each of the survey questions to make sure everything is correct.
- Click Next to go to the review page.

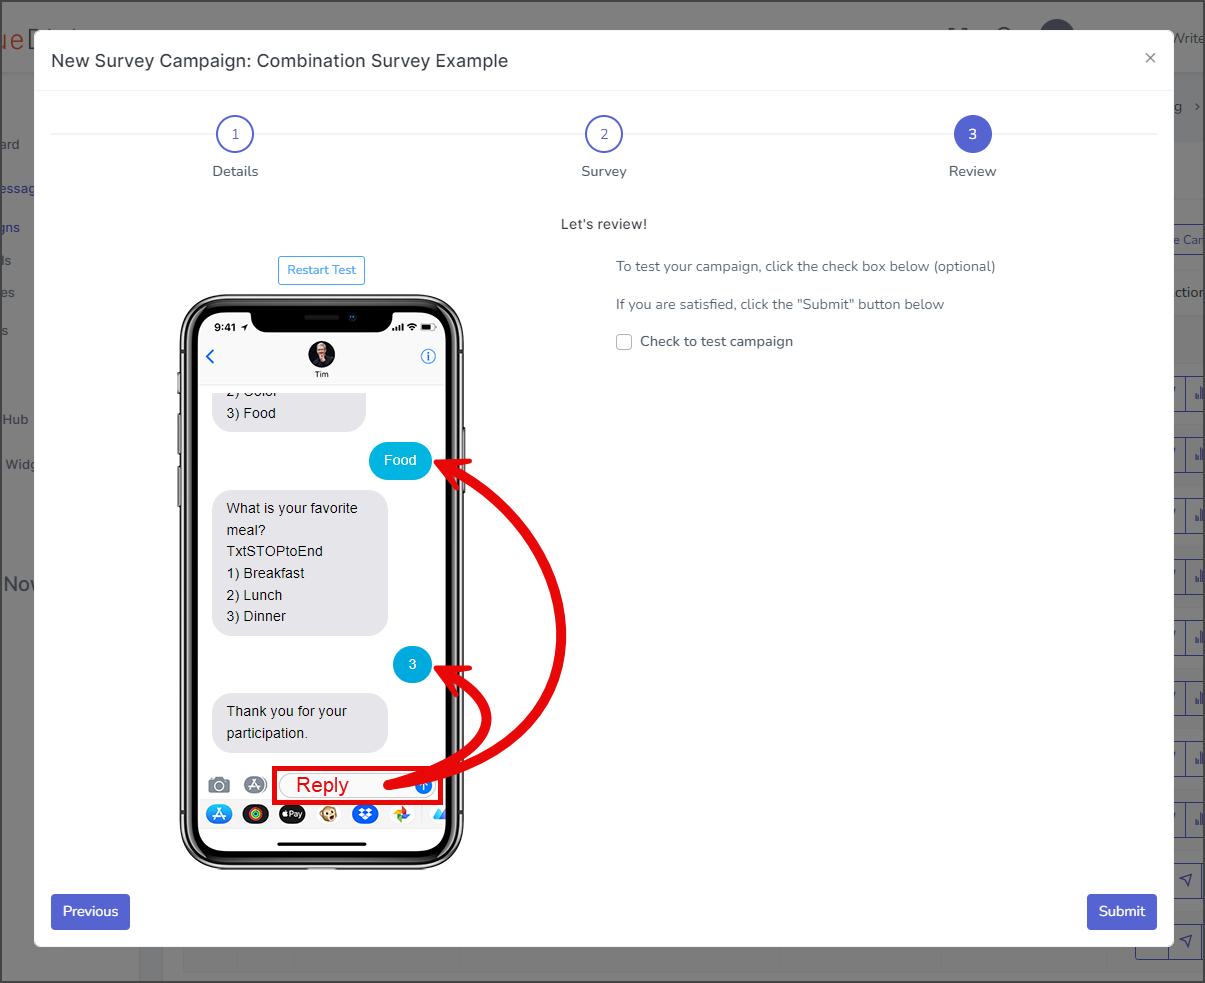
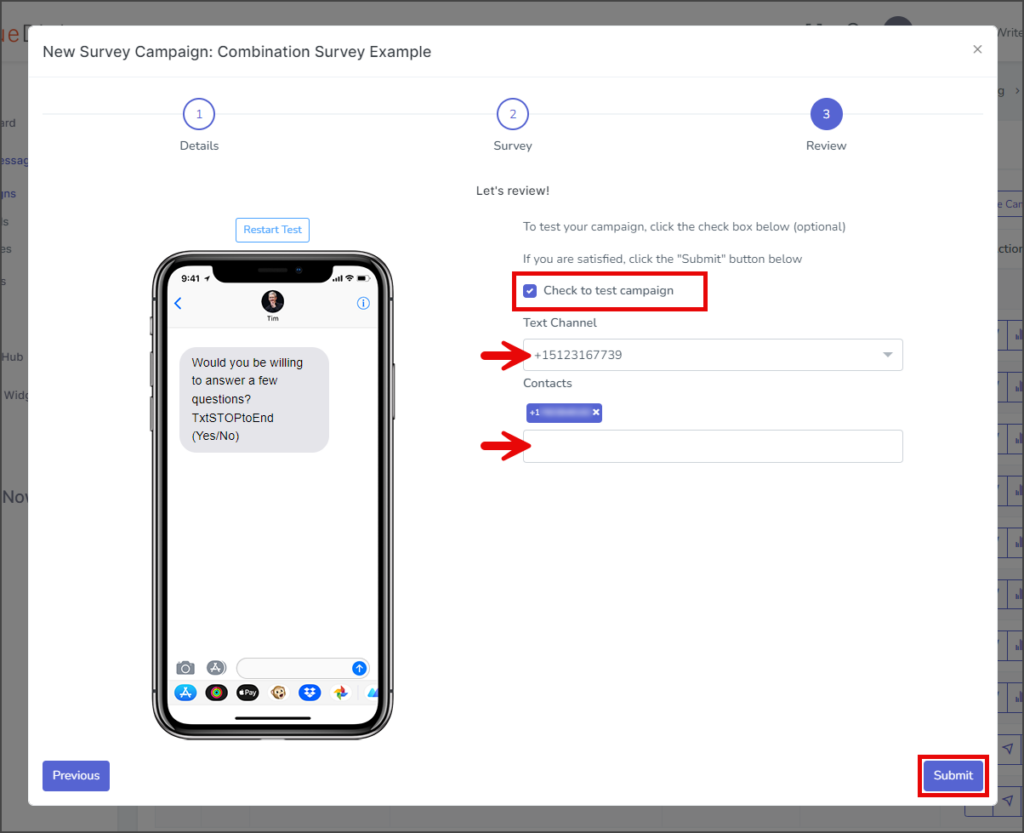
Review Page
- The Review page features an emulated phone that allows you to test your survey by sending messages and receiving replies.
- Click Restart Test to clear the message thread on the emulated phone and start over with the initial message.

- Click Restart Test to clear the message thread on the emulated phone and start over with the initial message.
- (Optional) Check to test campaign – If checked, the campaign message will be sent to the specified contact once the campaign is created.
- Note: It is strongly recommended that you test all campaigns before making them live.
- Click the Text Channel dropdown and select the channel to send the test message. This should be the same channel you will use to send your campaign.
- In the Contacts textbox, enter the phone numbers to receive the test message. To enter multiple phone numbers, type a comma after the number, and the number will automatically be added to the list of contacts.
- Click Submit to create the campaign. The campaign message will be sent to the listed contacts if the Check to test campaign checkbox is checked.
- After creating the campaign, a success message will appear in the upper right corner.