

TrueDialog API
API Documentation
This guide will help you get started with the TrueDialog API by showing you how to send SMS and MMS messages. We use Postman in this guide to make it easy for you to integrate these examples into your development environment.
Prerequisite
To access the TrueDialog API, you must have a TrueDialog account. If you have not already signed up, you can do so by taking advantage of the 15-day free trial available on the TrueDialog website.
In this guide, we included a Postman Collection file and a Postman Environment file that you can easily import into Postman. These files contain only the API calls and variables used in this guide.
For a comprehensive list of all available API calls, please see the following:
Get Account Information
Before starting the guide, you must gather information about your account from the TrueDialog Portal. The following unique information about your account is needed for this guide: Account ID (accountId), API Key (apiKey), Secret Key (apiSecret), and Long Code Phone Number (longCode). For more detailed information relating to creating and managing your API Keys, see the following article.
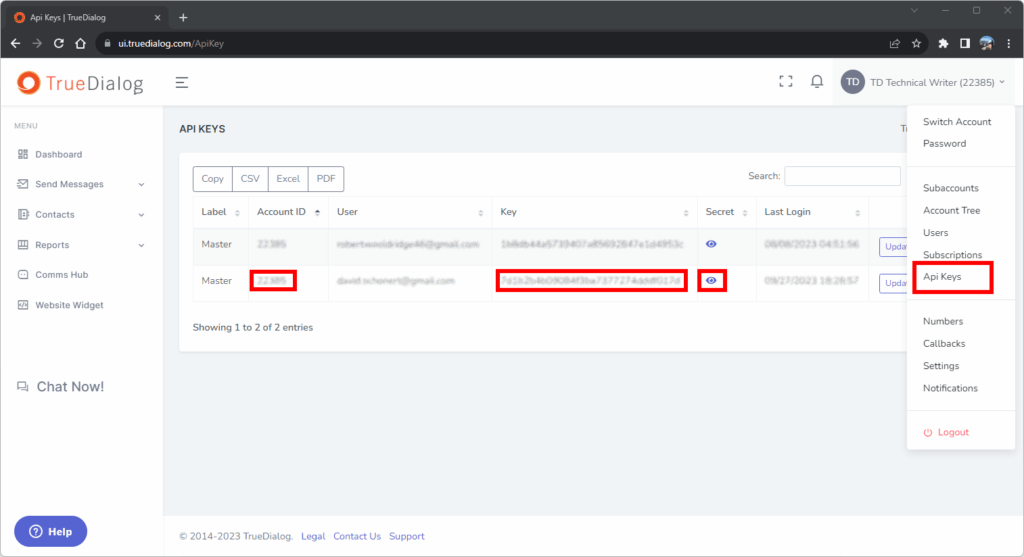
Step 1. Get Account ID, API Key, and Secret Key values
- Click on your account name in the upper right corner of the window to open a drop-down menu.
- Click Api Keys.
- Find your User in the list to get your Account ID, API Key, and Secret Key.
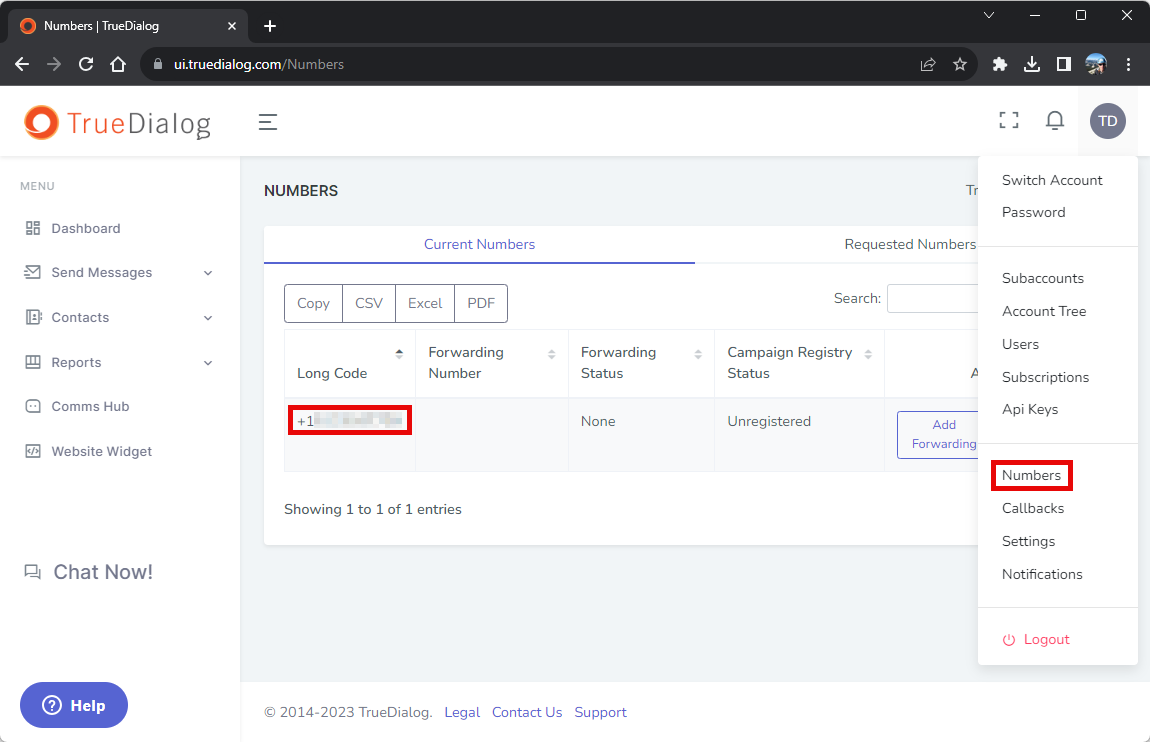
Step 2. Get Long Code Phone Number value
- Click on your account name in the upper right corner of the window to open a drop-down menu.
- Click Numbers.
- Find your Long Code from the table.
Authentication
All TrueDialog endpoints use HTTP Basic Authentication, and your accountId and password must be included with each REST call.
Your accountId and password were sent in the confirmation email when you created your TrueDialog account. This tutorial will refer to them as {AccountId} and {Password}.
You can also use your {apikey} and {secret} in place of {AccountId} and {Password}, respectively.
The {apikey} and {secret} can be found on the TrueDialog Portal:
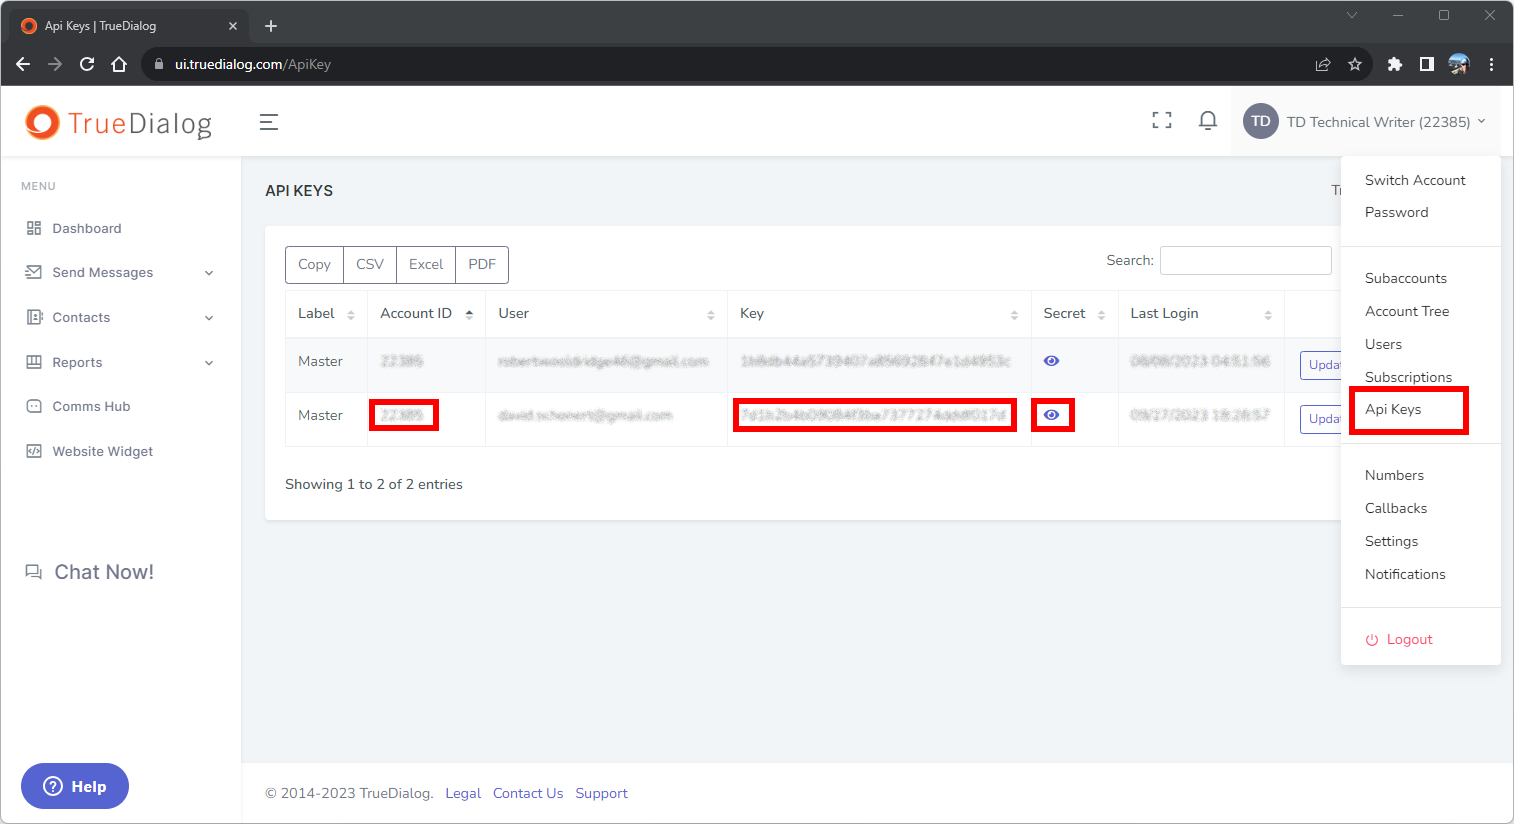
- Click on your account name in the upper right corner of the window to open a drop-down menu.
- Click Api Keys.
- Find your User in the list to get your Account ID, API Key, and Secret Key.
The {apikey} and {secret} can also be found by using the following endpoint:
GET
https://api.truedialog.com/api/v2.1/account/{AccountId}/apikey
NOTE: The {apikey} and {secret} will need to be sent to TrueDialog as a Base64-encoded string. There are several options to determine the string. One option is to use a Basic Authentication Header Generator. Input your {apikey} as the Username and the {secret} as the Password. The result will be a string you can include in authentication commands.
Verify API Account Credentials
TrueDialog offers multiple communication or transport channels: SMS, MMS, and Email. Each channel has an assigned ID. For many endpoints, the {AccountId} must be provided. Use the following command to verify the API {AccountId}.
GET
https://api.truedialog.com/api/v2.1/account/{AccountId}
To verify your credentials with cURL, use the following command:
curl -v --user {apikey}:{secret} "https://api.truedialog.com/api/v2.1/account/{AccountId}" \
-H "Content-Type: application/json" \
-H "Accept: application/json/"Authenticate with HTTP
TrueDialog supports using HTTP Basic Authentication to protect access to your web server. To authenticate using HTTP, you can provide a username and password using the following URL format:
https://username:password@www.mywebserver.com/my_secure_document
For further details on HTTP Basic Authentication, read Basic Authentication.
Set Up Postman
This guide is written using Postman v10.18. In this section, you will prepare your Postman environment to use the TrueDialog API.
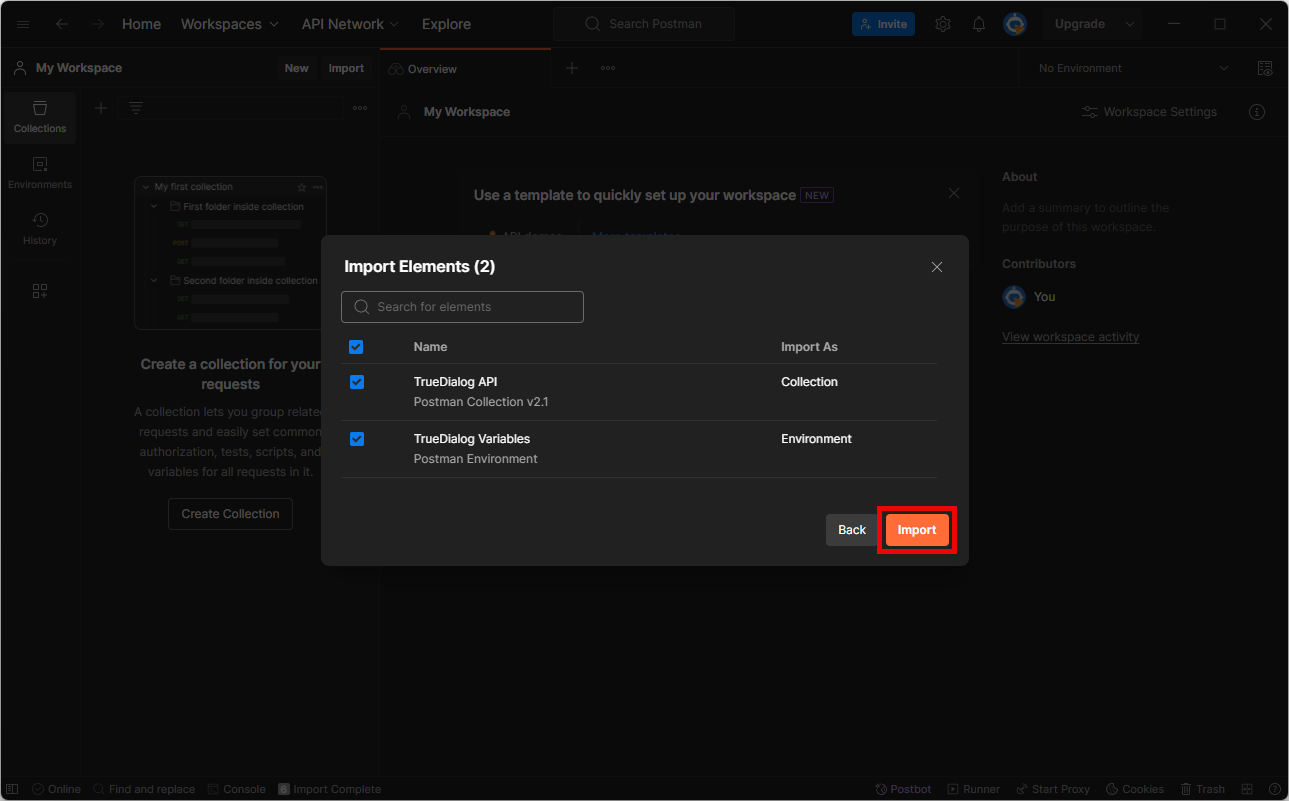
Step 1. Import
The TrueDialog Collection and TrueDialog Environment files need to be imported into Postman.
- Open Postman.
- Click the menu in the upper left and then File → Import…
- Add the
TrueDialog_API.postman_collection.jsonandTrueDialog_Variables.postman_environment.jsonfiles to the import window. - Once the files are added, click Import.
Step 2. Add Account Variables
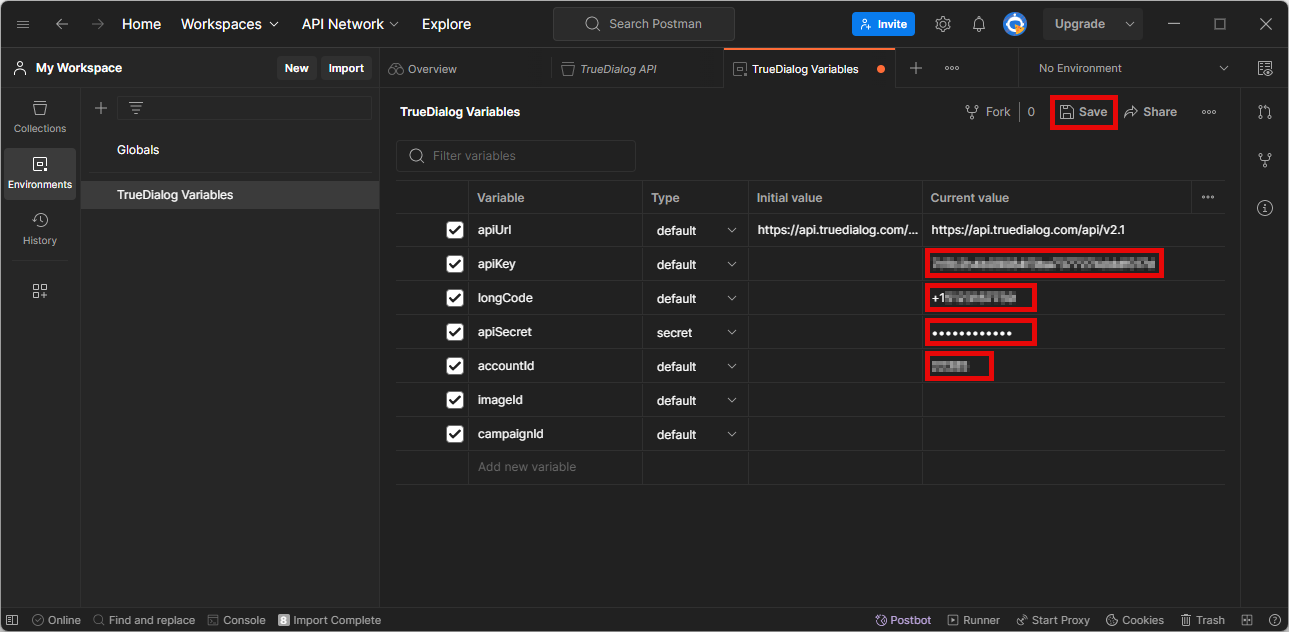
Your unique account information needs to be added to the TrueDialog Variables environment.
- Open Environments in the left sidebar and select TrueDialog Variables.
- Update the Current value fields in the Variables table with the values for your account.
- Enter the Account ID in the accountId field.
- Enter the API Key in the apiKey field.
- Enter the Secret Key in the apiSecret field.
- Enter the Long Code Phone Number in the longCode field. Note: The + is required at the start of all Long Code numbers in the TrueDialog API.
- Once the variables are updated, click Save.
Step 3. Set Active Environment
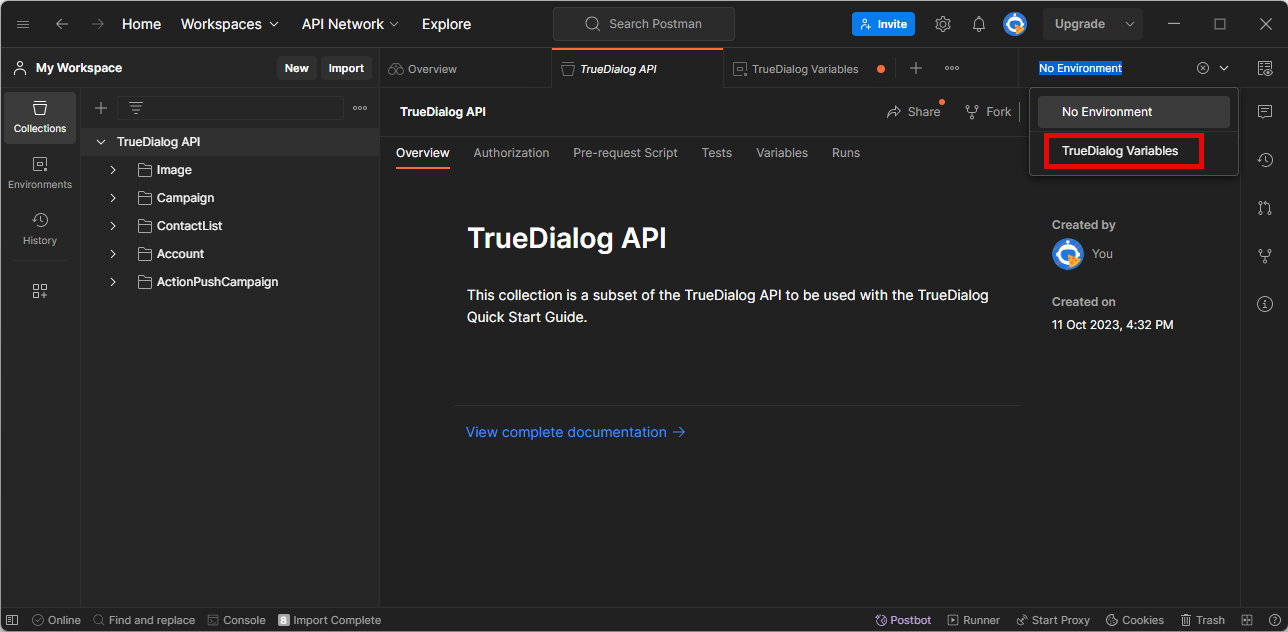
To use the TrueDialog Variables, you must set them as the active environment in Postman.
- Open Collections in the left sidebar and select TrueDialog API.
- Click on the Environment Selector, and from the drop-down list, select TrueDialog Variables.
Step 4. Test Postman Set Up
Verify that Postman is properly configured. You can do this by sending a GET request to the API and checking the response.
- Open Collections in the left sidebar and select TrueDialog API.
- Expand the TrueDialog API collection. Next, expand the Account folder, then select
Gets detailed information about a specific account. - Click Send and wait for a response.
- Verify that you get a
200response message. The body will have JSON data like the following: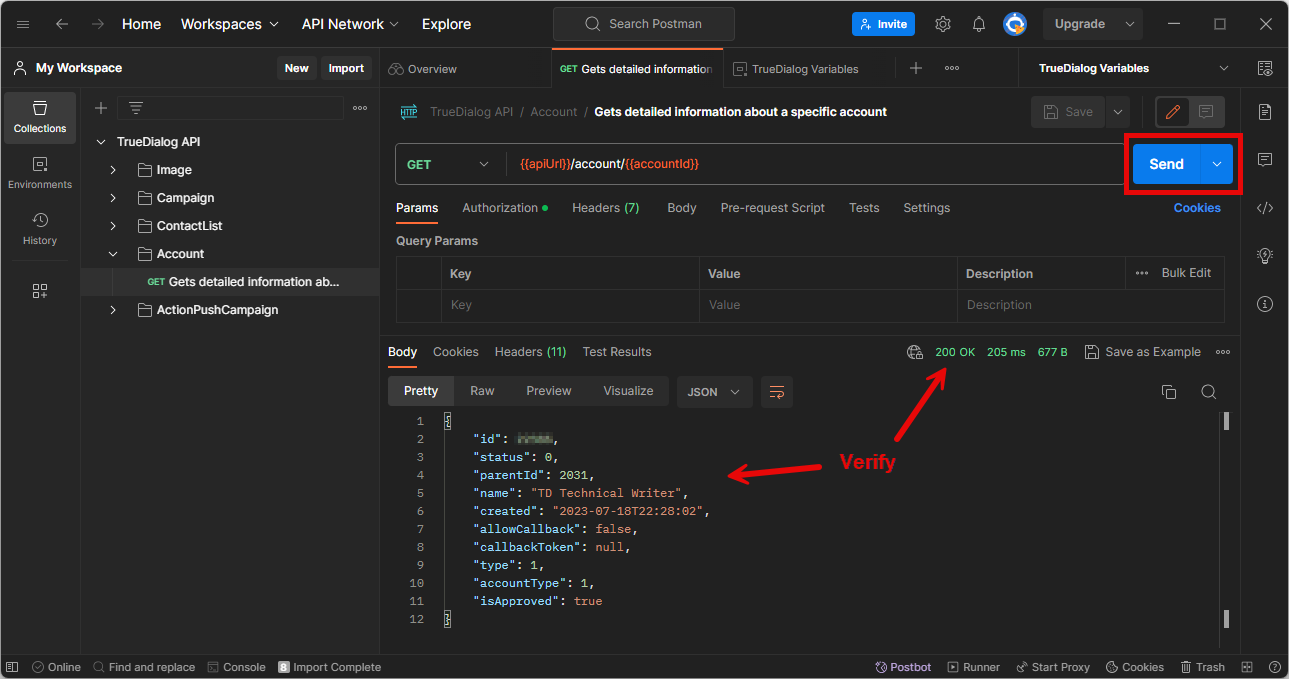
{
    "id": #####,
    "status": 0,
    "parentId": 2031,
    "name": "TD Technical Writer",
    "created": "2023-07-18T22:28:02",
    "allowCallback": false,
    "callbackToken": null,
    "type": 1,
    "accountType": 1,
    "isApproved": true
}Phone Numbers and Contacts
To send messages using the API, you must provide at least one destination phone number. You can either provide a list of phone numbers or use the Contact List feature in the TrueDialog API. The Contact List is stored in your TrueDialog account and provides powerful contact management tools that are not covered in this guide. See the Contact List section of the Popular Actions documentation for more details.
Send an SMS
This section will guide you through creating a campaign and then pushing it to your contacts. A campaign is an object that manages message distribution, callbacks, and other features.
Step 1. Create a Campaign
- Open Collections in the left sidebar and select TrueDialog API.
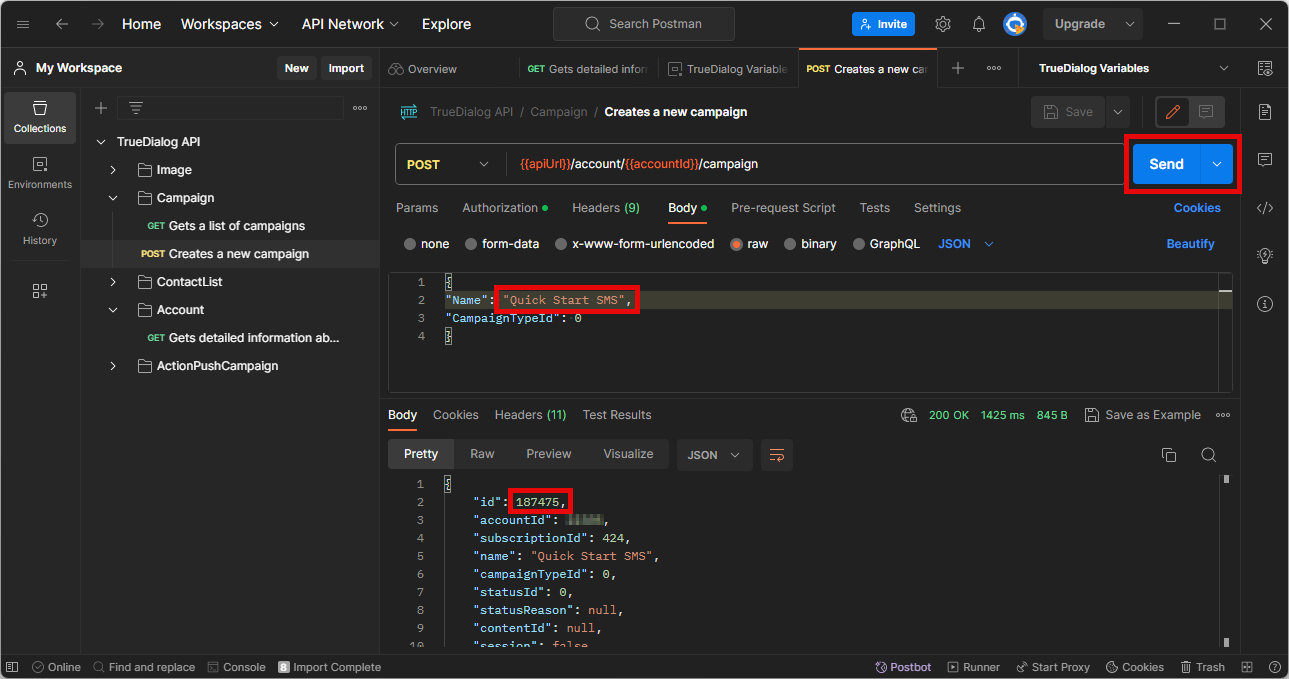
- Expand the Campaign folder and select
Creates a new campaign. - Add the campaign name to the Name field in the Body tab of
Creates a new campaign. - Click Save.
- Click Send to create the campaign.
- Verify that you receive a
200response. - Make note of the “id” value in the response; this is the campaignId that will be referenced later when sending the messages.
- Save this “id” to the campaignId variable and clear the imageId variable.
- Open the Environments in the left sidebar and select TrueDialog Variables.
- Enter the “id” value in the Current value field for the campaignId variable.
- Enter “” in the Current value field for the imageId variable. Empty quotes are necessary to prevent an error from occurring when sending an SMS message.
- Click Save.
Step 2. Push the Campaign
- Open the Collections in the left sidebar and select TrueDialog API.
- Expand the ActionPushCampaign folder and select
Creates a new push action. - Add phone numbers to the targets field in the Body tab of
Creates a new push actionto specify campaign recipients. Note: the + must be included at the start of each phone number.- Alternately, you can use a Contact List to supply the list of phone numbers. To do this, update the targets field with the contactListId. The contactListId can be obtained using the
GETrequestLists all available contact listsfrom the ContactList folder.
- Alternately, you can use a Contact List to supply the list of phone numbers. To do this, update the targets field with the contactListId. The contactListId can be obtained using the
- Add a message to the message field in the Body tab of the
Creates a new push action. This is the text message your contact will receive. - Click Save.
- Click Send to push the campaign message out to the contacts.
- Verify that you receive a
201response message with the status of the push.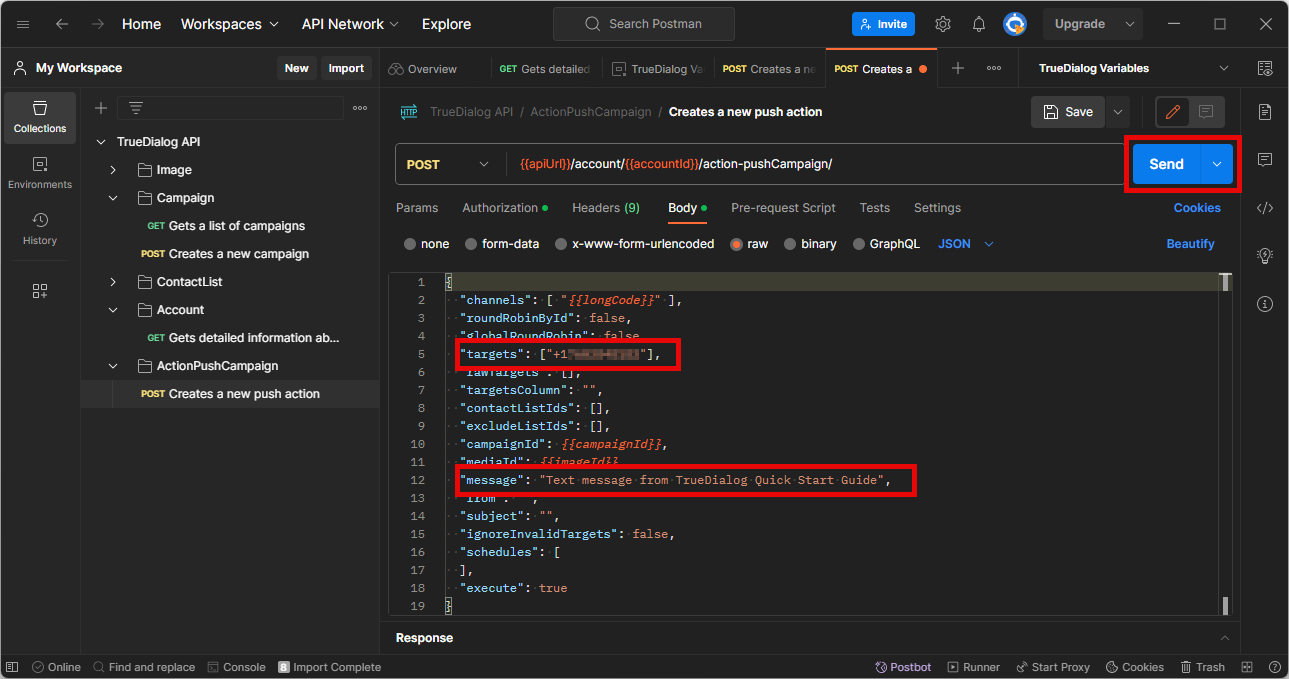
Send an MMS
This section will guide you through uploading an image, creating a campaign, and pushing it to your contacts. The process of sending an MMS message is similar to sending an SMS message, except it involves uploading and attaching an image.
Step 1. Upload an Image
- Open Collections in the left sidebar and select TrueDialog API.
- Expand the Image folder and select
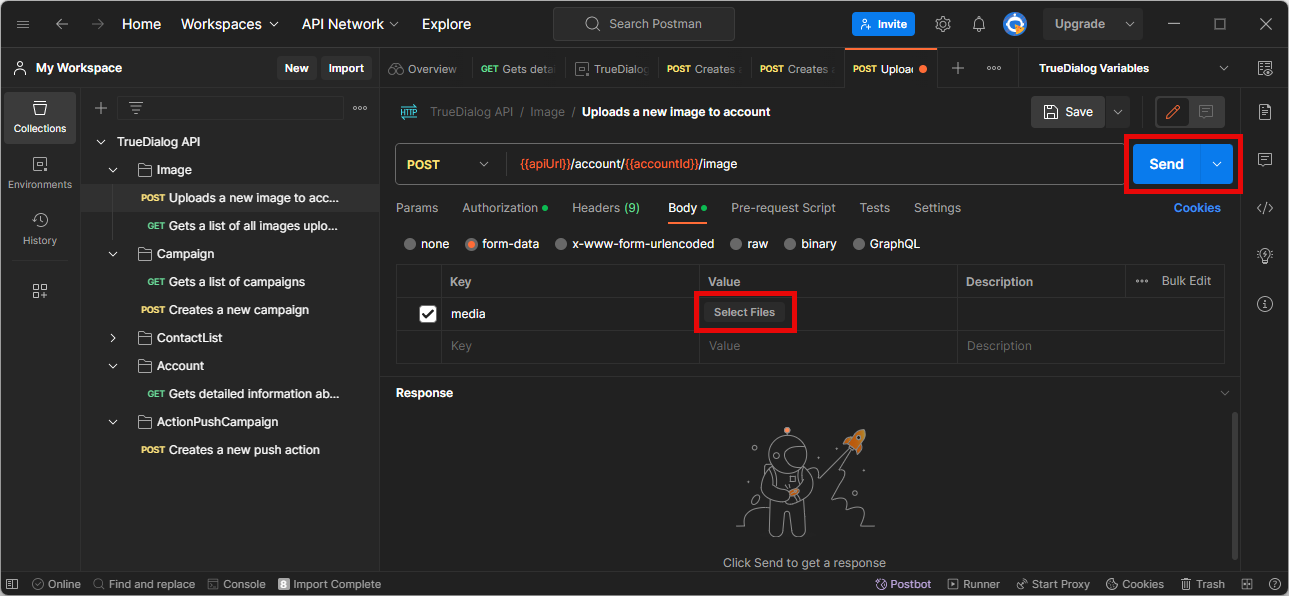
Uploads a new image to account. - Click the Select Files button in the media row on the Body tab of
Uploads a new imageto select a file to upload. - Click Save.
- Click Send to upload the image.
- Verify that you receive a
200response. - Make note of the “id” value in the response; this is the imageId that will be referenced later when sending the message.
- Save this “id” to the imageId variable.
- Open Environments in the left sidebar and select TrueDialog Variables.
- Enter the “id” value in the Current value field for the imageId variable.
- Click Save.
Step 2. Create a Campaign
- Open Collections in the left sidebar and select TrueDialog API.
- Expand the Campaign folder and select
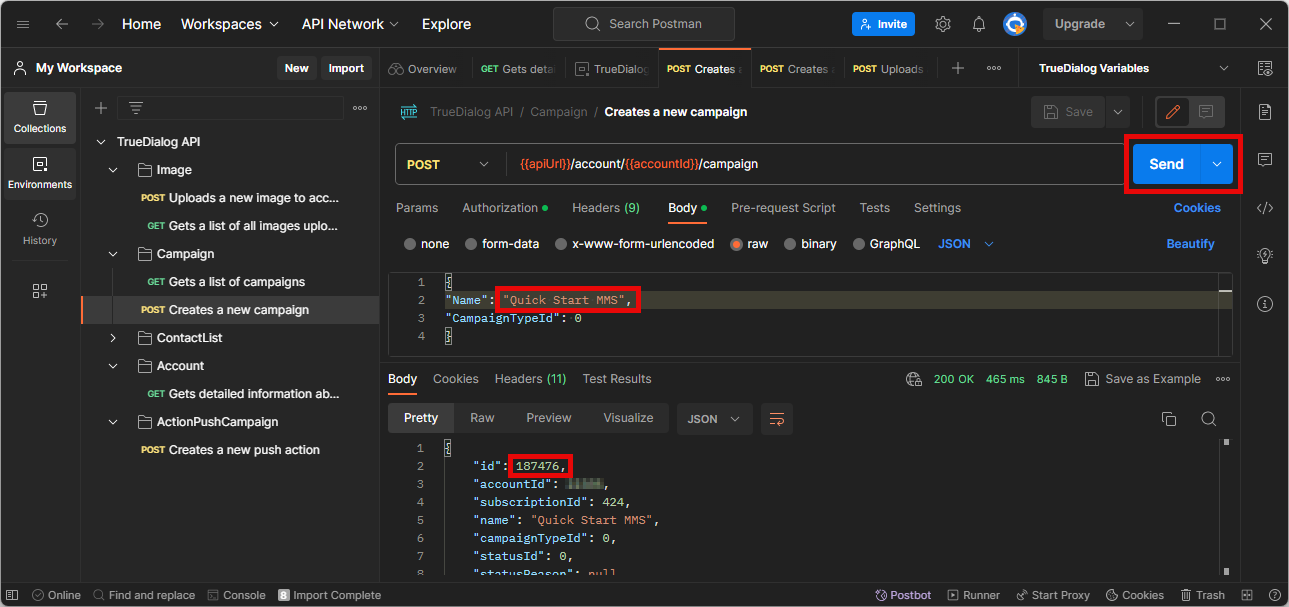
Creates a new campaign. - Add the campaign name to the Name field in the Body tab of
Creates a new campaign. - Click Save.
- Click Send to create the campaign.
- Verify that you receive a
200response. - Make note of the “id” value in the response; this is the campaignId that will be referenced later when sending the messages.
- Save this “id” to the campaignId variable.
- Open Environments in the left sidebar and select TrueDialog Variables.
- Enter the “id” value in the Current value field for the campaignId variable.
- Click Save.
Step 3. Push the Campaign
- Open Collections in the left sidebar and select TrueDialog API.
- Expand the ActionPushCampaign folder and select
Creates a new push action. - Add phone numbers to the targets field in the Body tab of
Creates a new push actionto specify campaign recipients. Note: the + must be included at the start of each phone number.- Alternately, you can use a Contact List to supply the list of phone numbers. To do this, update the targets field with the contactListId. The contactListId can be obtained using the
GETrequestLists all available contact listsfrom the ContactList folder.
- Alternately, you can use a Contact List to supply the list of phone numbers. To do this, update the targets field with the contactListId. The contactListId can be obtained using the
- Add a message to the message field in the Body tab of the
Creates a new push action. This is the text message your contact will receive. - Click Save.
- Click Send to push the campaign message out to the contacts.
- Verify that you receive a
201response message with the status of the push.